SPFieldUrlValue linkUrl = new SPFieldUrlValue();
linkUrl.Description = “Whatever”;
linkUrl.Url = anURL.ToString();
anItem["URL"] = linkUrl;
anItem.Update();
or
SPSite site = new SPSite(url);
SPWeb web = site.OpenWeb();
SPList list = web.Lists[listName];
SPListItem item = list.Items.Add();
item["Hyperlink"] = stringUrl + “, ” + stringDescription;
item.Update();
Monday, July 26, 2010
Programmatically adding items to a SharePoint list
SPWeb web = new SPSite("http://jagadeeshv:9999/abc").OpenWeb();
SPList list = web.Lists["Links"];
SPListItem newItem = list.Items.Add();
SPList list = web.Lists["Tasks"];
SPListItem newItem = list.Items.Add();
newItem["Title"] = "Creating New Task";
newItem["Status"] = "Not Started";
newItem["Priority"] = "Normal";
newItem.Update();
SPList list = web.Lists["Links"];
SPListItem newItem = list.Items.Add();
SPList list = web.Lists["Tasks"];
SPListItem newItem = list.Items.Add();
newItem["Title"] = "Creating New Task";
newItem["Status"] = "Not Started";
newItem["Priority"] = "Normal";
newItem.Update();
Creating Site programatically using sitetemplate(.stp file)
SPSite oSiteCollection = new SPSite(“http://servername/SiteDirectory”);
//(SPSite oSiteCollection = new SPSite("http://jagadeeshv:9999"))
SPWeb oWebSite = oSiteCollection.OpenWeb();
SPWebCollection oSitesCollection = oWebSite.Webs;
SPWeb newWebSite = oSitesCollection.Add("abc", "siteTemplate", "This is site created through code.", 1033, "Createsitestp.stp", true, false);
Tuesday, July 20, 2010
Simple workflow using WindowsWorkflowFoundation using visual studio 2005 for sharpoint
Windows SharePoint Services (WSS) 2007 is the first Microsoft server that has native support for the Windows WorkFlow Foundation (WF). The integration of WF and the 2007 release of SharePoint provides an infrastructure that drives processes around SharePoint's strong suit: collaboration and sharing of information. This release focuses on document-centric workflows, the procedures that a particular document goes through in its lifecycle (be they reviewing, editing, or approval). The new edition enables you to attach and run a process directly in a SharePoint document or list item. Additionally, the workflows within SharePoint spotlight human-based endeavors, tasks driven by human interaction as opposed to static, automated programmatic steps.
To examine the process, this article follows a report that needs to be approved before publication:
1. A document containing a report can automatically generate an Approval workflow, or the author can initialize it manually and select the individuals who need to approve it.
2. The workflow assigns approval tasks to those people and they are notified of their tasks via email.
3. They can assign their choice by clicking "approve" or "reject" on a special form provided by the workflow.
4. When all approvals are completed, the author receives notification that the report has been approved (or rejected) and it is ready for publication.
The Basics
SharePoint Server 2007 provides various out-of-the-box workflows that require no additional attention before using. These workflows include Approval (routes a document for approval), Collect Feedback (routes a document for review), Collect Signatures (gathers signatures), Disposition Approval (manages document expiration and retention), Group Approval (similar to the Approval workflow, but designed specifically for East Asian markets), Translation Management (manages document translation), and Issue Tracking (manages the issue tracking process by creating tasks for active issues assigned to users).
Many processes are very specific to an individual company's needs. Therefore, the WorkFlow Foundation provides an extensible infrastructure that can be used to create sophisticated workflows. WF provides a powerful platform with a unified programming model, and it works with familiar developmental tools such as Visual Studio 2005. Less powerful SharePoint workflows also can be created with SharePoint Designer (formally FrontPage), a web design and customization tool that allows users to create workflows without writing any code.
Using the Right Tools
A standard Visual Studio installation lacks the necessary tools to work with the WorkFlow Foundation, so to put things in motion you must install the Visual Studio 2005 extensions for .NET Framework 3.0 (Windows Workflow Foundation). The extensions provide the required references to the Foundation assemblies, the essential Activities needed, as well as the WorkFlow designer within Visual Studio and a number of project templates. Keep in mind that you must install DotNet Framework 3.0 as a prerequisite to working with WF.
A Visual Studio 2005 extension that is compatible with the WorkFlow Foundation to work with SharePoint is available, but at the time of writing it was in beta (Workflow Developer Starter Kit for Windows SharePoint Services 3.0). Note that this extension is not required if you are developing workflows for SharePoint (the extension makes a new template to initialize a project).
The first step in creating a workflow for SharePoint is crafting a new project in Visual Studio 2005 based in the Sequential Workflow Library (or in the State Machine Workflow Library, if you are making a state machine workflow) and assigning it a name. Visual Studio will generate the necessary code and configuration files. Add a reference to Windows SharePoint Services (Microsoft.SharePoint.dll) and, if you need to work with Microsoft Office SharePoint Server, a reference to Microsoft Office SharePoint Server component (microsoft.sharepoint.portal.dll). This establishes references to the object model of SharePoint, opening the door to interactions with it.
Although it's not compulsory, it simplifies coding if you write directives to the next namespaces in the code behind file, for example:
using Microsoft.SharePoint;
using Microsoft.SharePoint.Workflow;
using Microsoft.SharePoint.WorkflowActions;
Finally, you need to add an activity to the Visual Studio toolbox. Using the context menu (right-click into the toolbox), select Choose items and in the .NET Framework Components tab, check the OnWorkflowActivated activity to activate it in the toolbox. This activity is indispensable for running workflows in SharePoint.
As a demonstration, the following example builds a simple workflow that illustrates the lifecycle of a WF within SharePoint: initializing the workflow, transporting information from SharePoint, processing it, and feeding it back to WSS (see Figure 1).
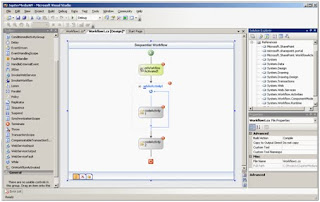
Figure 1. The Example WorkFlow in the Visual Studio WorkFlow Designer
You initialize the process by creating the workflow using the WorkFlow Designer in Visual Studio. The opening activity is always the OnWorkflowActivated for workflows in SharePoint. Next, install a While activity with a Code Activity inside to process the information. Finally, install another Code Activity to return information to SharePoint. Bear in mind that this is not a functional workflow you would use in a business application, but a demonstration of each part of the interaction between WF and SharePoint.
Extracting Information from the External World: SharePoint to the WorkFlow
The first stage in the codification of the workflow involves defining some variables in the code behind page to be used later, for example:
public SPWorkflowActivationProperties FlowProperties =
new SPWorkflowActivationProperties();
private string _myDocument = string.Empty;
private int _CounterLetters = 0;
private int _CounterVowels = 0;
The activation properties will be stored in the FlowProperties variable, and extra global variables for the internal work are defined.
As Figure 1 shows, each activity has a red mark at the right corner, indicating that the configuration is incomplete. Returning to the Designer, you now can configure the OnWorkflowActivated activity using the defined variables (see Figure 2).
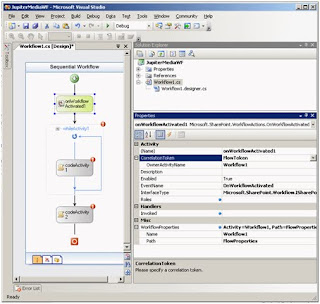
Click here for a larger image.
Figure 2. Configuration Panel of the OnWorkflowActivated Activity
In the Properties panel, create the subsequent configurations:
1. Correlation Token: Choose a distinctive name (FlowToken, for example). After the name configuration, a plus symbol will appear where the OwnerActivityName can be selected (Workflow1 in the example).
2. Click the ellipses button of WorkFlowProperties and, in the new window, choose the code defined previously in FlowProperties.
If the configuration parameters are correct, the red mark in the activity will disappear.
As with all Visual Studio projects, if you double-click on an activity, Visual Studio will fashion the corresponding event handler. When you double-click the OnWorkflowActivated activity, Visual Studio writes the event handler method automatically and the user writes the corresponding logic inside:
private void onWorkflowActivated1_Invoked(object sender,
ExternalDataEventArgs e)
{
SPListItem myActivator = FlowProperties.Item;
_myDocument = myActivator.Name.ToLower();
_CounterLetters = _myDocument.Length;
}
By using this activity, you can find all the relevant information from the SharePoint context. The flow is initialized by an element of a List (of the SharePoint type SPListITem), and from the object that contains the element information, you can find its name (located in the variable _myDocument) and the number of letters in the document name (stored in the _CounterLetters variable).
In the FlowProperties object, you can find all the necessary information from the SharePoint context. The SharePoint web, site, and list objects are present, as well as the Task List that generates alerts for other users. Everything you need to process the variable later is present.
Processing the Information: the WorkFlow in Action
Once the information from SharePoint has been captured, the next step is to process it. With a double-click on the activity inside the While loop, Visual Studio generates the corresponding event handler, where you can write the business logic:
private void codeActivity1_ExecuteCode(object sender, EventArgs e)
{
_CounterLetters--;
char[] AllVowels = new char[] { 'a', 'e', 'i', 'o', 'u' };
Array.Sort(AllVowels);
if (Array.BinarySearch(AllVowels,
_myDocument[_CounterLetters]) >= 0)
_CounterVowels++;
}
The procedure for the example will count the number of vowels in the name of the document. The algorithm is not optimal for a large number of instances of the workflow, but sufficient for the example (the method IndexOf of the array may be a more effective way to calculate the number of vowels).
At this point, it is important to construct the configuration of the While activity. From the Properties panel, compose the following configurations:
1. Condition: Choose "Declarative Rule Condition."
2. ConditionName (expanding the Condition property): Give it a recognizable name.
3. Expression: In the "Rule Condition Editor," which can be activated by using the ellipses button, write the condition necessary to remain in the loop (for the example, "this._CounterLetters > 0"). Until all the letters are "read" and the vowels are counted, the loop statement will continue.
This step is essential to the overall workflow because it implements the flow's logic. The example uses only one code activity inside a loop activity, but in an actual situation it would be composed of many different kinds of activities.
Taking Information Back to the External World: From the WorkFlow to SharePoint
The second Code activity in the example controls returning the processed information from the WorkFlow engine to the SharePoint context. You can use the event handler of the activity to write information back into SharePoint as follows:
private void codeActivity2_ExecuteCode(object sender, EventArgs e)
{
SPListItem myActivator = FlowProperties.Item;
myActivator["Title"] = _myDocument + " has " +
_CounterVowels.ToString() + " vowels";
myActivator.Update();
}
Initially, the code crafts an object of the type Microsoft.SharePoint.SPListItem, calling the Item method of the SharePoint properties, and then changes the title of the element that has begun the WorkFlow, appending a string and the calculated number of vowels in the name of the document.
Because the workflow has access to the complete context of SharePoint, it can perform internally any authorized modification (write to lists and libraries, change properties, as well as create, edit, and delete elements). Everything, that is, within the authorization and authentication context of the user who has initialized the WorkFlow.
An additional method of interaction with users is to employ ASP.NET forms that you apply with your Windows SharePoint Services workflow. You then display these forms in the SharePoint user interface at the appropriate stages in the workflow. There can be four types of forms:
• Association: This form will be displayed to administrators when they first add or associate the WorkFlow with a particular List or document Library.
• Initialization: A user starting the WorkFlow manually will be confronted with this form. At this point, the user may override or append the association parameters.
• Modification: The form that enables users to alter the WorkFlow while it is running.
• Task: This form assigns jobs to the flow participants.
Deploying and Using the WorkFlow
Because the assembly of the workflow generated by the compilation in Visual Studio must be installed in the Global Assembly Cache (GAC), it needs to be signed as strong. You can use the standard Visual Studio 2005 infrastructure to sign it or the sn tool with the parameter -T. After the compilation is complete, you can use the gacutil tool to install the assembly in the GAC.
You use features to deploy workflows in SharePoint. As a new paradigm in SharePoint 2007, the feature was created as a way to encapsulate solutions and functionality for ease of deployment. Additionally, it provides a mechanism by which developers can package the files needed for a solution (as a workflow) intended for distribution.
Each feature must include a WorkFlow definition template (an XML file) that contains the information SharePoint requires to instantiate and run the WorkFlow, as well as a feature definition (also an XML file) with information concerning the feature itself. To install the example workflow, create a new Feature.xml file with the following code:
Description="Example WorkFlow"
Version="12.0.0.0"
Scope="Site"
xmlns="http://schemas.microsoft.com/sharepoint/">
The Feature Id parameter is a Windows GUID that you can fashion with the GUID Generator component included in Visual Studio. A second file called Flow.xml, with the following code, defines the WorkFlow for SharePoint:
Id="B2196C5B-1579-4bb7-B23E-01DC6A898ABC"
CodeBesideClass="JupiterMediaWF.Workflow1"
CodeBesideAssembly="JupiterMediaWF, Version=1.0.0.0,
Culture=neutral,
PublicKeyToken=99ca3967f3ef49e3">
_layouts/WrkStat.aspx
Copy both files to a new directory under the hive:
C:\Program Files\Common Files\Microsoft Shared\
web server extensions\12\TEMPLATE\FEATURES\JupiterWF
And install and activate the workflow using the SharePoint Administrators tool stsadm, with the following syntax:
To install the workflow:
C:\Documents and Settings\Administrator>"C:\Program Files\
Common Files\Microsoft Shared\web server extensions\12\BIN\
STSADM.EXE" -o activatefeature -name JupiterWF -force
To activate the workflow:
C:\Documents and Settings\Administrator>"C:\Program Files\
Common Files\Microsoft Shared\web server extensions\12\BIN\
STSADM.EXE" -o installfeature -name JupiterWF -force
At this point, you must link the workflow with the document library where it will operate (see Figure 3).
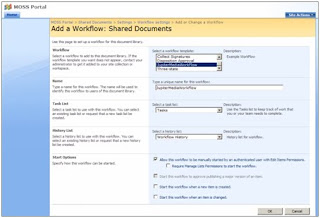
Click here for a larger image.
Figure 3. Setup of the Workflow in a Document Library
From the Document Library Settings page, proceed to Workflow Settings and, using the page Add a Workflow, select the workflow from the ComboBox. Give it a name, decide on a List to be used for its tasks and another one for the History (either use an existing list or create a new one), and select the start options (you can start it manually or automatically).
After creating a new document in the library, the user can utilize the context menu of the element to proceed to the page where he or she can select and activate the workflow (see Figure 4).
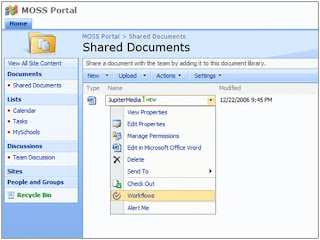
Click here for a larger image.
Figure 4. Activating a WorkFlow for a Document
Multiple workflows can run simultaneously on the same item, but only one instance of a specific workflow can run on a specific item at any given time. At the end of the working process of the flow, the result appear in the properties page of the document (see Figure 5).
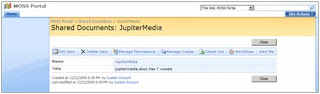
Click here for a larger image.
Figure 5. Properties of the Document After Completing the WorkFlow
Note: In the properties page, the workflow has made a count of the vowels in the document's name and has altered its title to include the counter.
Integrating Divergent Worlds
The interaction between the Windows WorkFlow Foundation and Microsoft SharePoint 2007 offers an excellent way to attach business processes to items, and it provides the opportunity to control almost any aspect of a document's lifecycle and user interaction within SharePoint. A workflow can be as simple or complex as your business process requires, and it can be initiated either by users or automatically based on some event.
The architecture of the Foundation and its implementation in SharePoint allows for substantial flexibility to make changes in the business layers. It provides the option of reuse without having to alter the portal's deep infrastructure and unlocks new prospects for software architects, developers, and system administrators.
Download the Code
You can download the example workflow here.
To examine the process, this article follows a report that needs to be approved before publication:
1. A document containing a report can automatically generate an Approval workflow, or the author can initialize it manually and select the individuals who need to approve it.
2. The workflow assigns approval tasks to those people and they are notified of their tasks via email.
3. They can assign their choice by clicking "approve" or "reject" on a special form provided by the workflow.
4. When all approvals are completed, the author receives notification that the report has been approved (or rejected) and it is ready for publication.
The Basics
SharePoint Server 2007 provides various out-of-the-box workflows that require no additional attention before using. These workflows include Approval (routes a document for approval), Collect Feedback (routes a document for review), Collect Signatures (gathers signatures), Disposition Approval (manages document expiration and retention), Group Approval (similar to the Approval workflow, but designed specifically for East Asian markets), Translation Management (manages document translation), and Issue Tracking (manages the issue tracking process by creating tasks for active issues assigned to users).
Many processes are very specific to an individual company's needs. Therefore, the WorkFlow Foundation provides an extensible infrastructure that can be used to create sophisticated workflows. WF provides a powerful platform with a unified programming model, and it works with familiar developmental tools such as Visual Studio 2005. Less powerful SharePoint workflows also can be created with SharePoint Designer (formally FrontPage), a web design and customization tool that allows users to create workflows without writing any code.
Using the Right Tools
A standard Visual Studio installation lacks the necessary tools to work with the WorkFlow Foundation, so to put things in motion you must install the Visual Studio 2005 extensions for .NET Framework 3.0 (Windows Workflow Foundation). The extensions provide the required references to the Foundation assemblies, the essential Activities needed, as well as the WorkFlow designer within Visual Studio and a number of project templates. Keep in mind that you must install DotNet Framework 3.0 as a prerequisite to working with WF.
A Visual Studio 2005 extension that is compatible with the WorkFlow Foundation to work with SharePoint is available, but at the time of writing it was in beta (Workflow Developer Starter Kit for Windows SharePoint Services 3.0). Note that this extension is not required if you are developing workflows for SharePoint (the extension makes a new template to initialize a project).
The first step in creating a workflow for SharePoint is crafting a new project in Visual Studio 2005 based in the Sequential Workflow Library (or in the State Machine Workflow Library, if you are making a state machine workflow) and assigning it a name. Visual Studio will generate the necessary code and configuration files. Add a reference to Windows SharePoint Services (Microsoft.SharePoint.dll) and, if you need to work with Microsoft Office SharePoint Server, a reference to Microsoft Office SharePoint Server component (microsoft.sharepoint.portal.dll). This establishes references to the object model of SharePoint, opening the door to interactions with it.
Although it's not compulsory, it simplifies coding if you write directives to the next namespaces in the code behind file, for example:
using Microsoft.SharePoint;
using Microsoft.SharePoint.Workflow;
using Microsoft.SharePoint.WorkflowActions;
Finally, you need to add an activity to the Visual Studio toolbox. Using the context menu (right-click into the toolbox), select Choose items and in the .NET Framework Components tab, check the OnWorkflowActivated activity to activate it in the toolbox. This activity is indispensable for running workflows in SharePoint.
As a demonstration, the following example builds a simple workflow that illustrates the lifecycle of a WF within SharePoint: initializing the workflow, transporting information from SharePoint, processing it, and feeding it back to WSS (see Figure 1).

Figure 1. The Example WorkFlow in the Visual Studio WorkFlow Designer
You initialize the process by creating the workflow using the WorkFlow Designer in Visual Studio. The opening activity is always the OnWorkflowActivated for workflows in SharePoint. Next, install a While activity with a Code Activity inside to process the information. Finally, install another Code Activity to return information to SharePoint. Bear in mind that this is not a functional workflow you would use in a business application, but a demonstration of each part of the interaction between WF and SharePoint.
Extracting Information from the External World: SharePoint to the WorkFlow
The first stage in the codification of the workflow involves defining some variables in the code behind page to be used later, for example:
public SPWorkflowActivationProperties FlowProperties =
new SPWorkflowActivationProperties();
private string _myDocument = string.Empty;
private int _CounterLetters = 0;
private int _CounterVowels = 0;
The activation properties will be stored in the FlowProperties variable, and extra global variables for the internal work are defined.
As Figure 1 shows, each activity has a red mark at the right corner, indicating that the configuration is incomplete. Returning to the Designer, you now can configure the OnWorkflowActivated activity using the defined variables (see Figure 2).

Click here for a larger image.
Figure 2. Configuration Panel of the OnWorkflowActivated Activity
In the Properties panel, create the subsequent configurations:
1. Correlation Token: Choose a distinctive name (FlowToken, for example). After the name configuration, a plus symbol will appear where the OwnerActivityName can be selected (Workflow1 in the example).
2. Click the ellipses button of WorkFlowProperties and, in the new window, choose the code defined previously in FlowProperties.
If the configuration parameters are correct, the red mark in the activity will disappear.
As with all Visual Studio projects, if you double-click on an activity, Visual Studio will fashion the corresponding event handler. When you double-click the OnWorkflowActivated activity, Visual Studio writes the event handler method automatically and the user writes the corresponding logic inside:
private void onWorkflowActivated1_Invoked(object sender,
ExternalDataEventArgs e)
{
SPListItem myActivator = FlowProperties.Item;
_myDocument = myActivator.Name.ToLower();
_CounterLetters = _myDocument.Length;
}
By using this activity, you can find all the relevant information from the SharePoint context. The flow is initialized by an element of a List (of the SharePoint type SPListITem), and from the object that contains the element information, you can find its name (located in the variable _myDocument) and the number of letters in the document name (stored in the _CounterLetters variable).
In the FlowProperties object, you can find all the necessary information from the SharePoint context. The SharePoint web, site, and list objects are present, as well as the Task List that generates alerts for other users. Everything you need to process the variable later is present.
Processing the Information: the WorkFlow in Action
Once the information from SharePoint has been captured, the next step is to process it. With a double-click on the activity inside the While loop, Visual Studio generates the corresponding event handler, where you can write the business logic:
private void codeActivity1_ExecuteCode(object sender, EventArgs e)
{
_CounterLetters--;
char[] AllVowels = new char[] { 'a', 'e', 'i', 'o', 'u' };
Array.Sort(AllVowels);
if (Array.BinarySearch(AllVowels,
_myDocument[_CounterLetters]) >= 0)
_CounterVowels++;
}
The procedure for the example will count the number of vowels in the name of the document. The algorithm is not optimal for a large number of instances of the workflow, but sufficient for the example (the method IndexOf of the array may be a more effective way to calculate the number of vowels).
At this point, it is important to construct the configuration of the While activity. From the Properties panel, compose the following configurations:
1. Condition: Choose "Declarative Rule Condition."
2. ConditionName (expanding the Condition property): Give it a recognizable name.
3. Expression: In the "Rule Condition Editor," which can be activated by using the ellipses button, write the condition necessary to remain in the loop (for the example, "this._CounterLetters > 0"). Until all the letters are "read" and the vowels are counted, the loop statement will continue.
This step is essential to the overall workflow because it implements the flow's logic. The example uses only one code activity inside a loop activity, but in an actual situation it would be composed of many different kinds of activities.
Taking Information Back to the External World: From the WorkFlow to SharePoint
The second Code activity in the example controls returning the processed information from the WorkFlow engine to the SharePoint context. You can use the event handler of the activity to write information back into SharePoint as follows:
private void codeActivity2_ExecuteCode(object sender, EventArgs e)
{
SPListItem myActivator = FlowProperties.Item;
myActivator["Title"] = _myDocument + " has " +
_CounterVowels.ToString() + " vowels";
myActivator.Update();
}
Initially, the code crafts an object of the type Microsoft.SharePoint.SPListItem, calling the Item method of the SharePoint properties, and then changes the title of the element that has begun the WorkFlow, appending a string and the calculated number of vowels in the name of the document.
Because the workflow has access to the complete context of SharePoint, it can perform internally any authorized modification (write to lists and libraries, change properties, as well as create, edit, and delete elements). Everything, that is, within the authorization and authentication context of the user who has initialized the WorkFlow.
An additional method of interaction with users is to employ ASP.NET forms that you apply with your Windows SharePoint Services workflow. You then display these forms in the SharePoint user interface at the appropriate stages in the workflow. There can be four types of forms:
• Association: This form will be displayed to administrators when they first add or associate the WorkFlow with a particular List or document Library.
• Initialization: A user starting the WorkFlow manually will be confronted with this form. At this point, the user may override or append the association parameters.
• Modification: The form that enables users to alter the WorkFlow while it is running.
• Task: This form assigns jobs to the flow participants.
Deploying and Using the WorkFlow
Because the assembly of the workflow generated by the compilation in Visual Studio must be installed in the Global Assembly Cache (GAC), it needs to be signed as strong. You can use the standard Visual Studio 2005 infrastructure to sign it or the sn tool with the parameter -T. After the compilation is complete, you can use the gacutil tool to install the assembly in the GAC.
You use features to deploy workflows in SharePoint. As a new paradigm in SharePoint 2007, the feature was created as a way to encapsulate solutions and functionality for ease of deployment. Additionally, it provides a mechanism by which developers can package the files needed for a solution (as a workflow) intended for distribution.
Each feature must include a WorkFlow definition template (an XML file) that contains the information SharePoint requires to instantiate and run the WorkFlow, as well as a feature definition (also an XML file) with information concerning the feature itself. To install the example workflow, create a new Feature.xml file with the following code:
Description="Example WorkFlow"
Version="12.0.0.0"
Scope="Site"
xmlns="http://schemas.microsoft.com/sharepoint/">
The Feature Id parameter is a Windows GUID that you can fashion with the GUID Generator component included in Visual Studio. A second file called Flow.xml, with the following code, defines the WorkFlow for SharePoint:
Id="B2196C5B-1579-4bb7-B23E-01DC6A898ABC"
CodeBesideClass="JupiterMediaWF.Workflow1"
CodeBesideAssembly="JupiterMediaWF, Version=1.0.0.0,
Culture=neutral,
PublicKeyToken=99ca3967f3ef49e3">
Copy both files to a new directory under the hive:
C:\Program Files\Common Files\Microsoft Shared\
web server extensions\12\TEMPLATE\FEATURES\JupiterWF
And install and activate the workflow using the SharePoint Administrators tool stsadm, with the following syntax:
To install the workflow:
C:\Documents and Settings\Administrator>"C:\Program Files\
Common Files\Microsoft Shared\web server extensions\12\BIN\
STSADM.EXE" -o activatefeature -name JupiterWF -force
To activate the workflow:
C:\Documents and Settings\Administrator>"C:\Program Files\
Common Files\Microsoft Shared\web server extensions\12\BIN\
STSADM.EXE" -o installfeature -name JupiterWF -force
At this point, you must link the workflow with the document library where it will operate (see Figure 3).

Click here for a larger image.
Figure 3. Setup of the Workflow in a Document Library
From the Document Library Settings page, proceed to Workflow Settings and, using the page Add a Workflow, select the workflow from the ComboBox. Give it a name, decide on a List to be used for its tasks and another one for the History (either use an existing list or create a new one), and select the start options (you can start it manually or automatically).
After creating a new document in the library, the user can utilize the context menu of the element to proceed to the page where he or she can select and activate the workflow (see Figure 4).

Click here for a larger image.
Figure 4. Activating a WorkFlow for a Document
Multiple workflows can run simultaneously on the same item, but only one instance of a specific workflow can run on a specific item at any given time. At the end of the working process of the flow, the result appear in the properties page of the document (see Figure 5).

Click here for a larger image.
Figure 5. Properties of the Document After Completing the WorkFlow
Note: In the properties page, the workflow has made a count of the vowels in the document's name and has altered its title to include the counter.
Integrating Divergent Worlds
The interaction between the Windows WorkFlow Foundation and Microsoft SharePoint 2007 offers an excellent way to attach business processes to items, and it provides the opportunity to control almost any aspect of a document's lifecycle and user interaction within SharePoint. A workflow can be as simple or complex as your business process requires, and it can be initiated either by users or automatically based on some event.
The architecture of the Foundation and its implementation in SharePoint allows for substantial flexibility to make changes in the business layers. It provides the option of reuse without having to alter the portal's deep infrastructure and unlocks new prospects for software architects, developers, and system administrators.
Download the Code
You can download the example workflow here.
SharePoint 2007 Versus 2010 Comparision
SharePoint went through a major overhaul in capabiltiy, ease of use, ease of administration, and ease of integration. This comparison of SharePoint 2010 version SharePoint 2007 is for those most familiar with the 2007 version.
Complete Feature List for Comparison
User Interface Changes,
List Changes,
Content Management Changes,
Software Development Changes,
Functional Changes,
Backup/Recover/Upgrade Changes,
Web Services Changes,
Site Changes,
Search Changes,
Database Changes,
Architecture Changes,
New Databases,
SharePoint Configuration
Database Changes
User Interface Changes Customers familiar with the previous version of SharePoint will notice some major changes to the user interface in SharePoint 2010.

The new changes are:
1. Ribbon UI – all managements and changes are done via the new Rubbon UI interface that we know by Office 2007 that is called Fluent UI now. This user interface concept has been adopted by SharePoint 2010 to provide a seamless, familiar and responsive user experience across the entire Office suite
2. Multilingual UI – SharePoint 2010 provides different localization of the interfaces. Compating to SharePoint 2007 when you can localize only content, SharePoint 2010 provides you multilingual support for Ribbon, menus and site navigation. Moreover, site owners can configure fields within lists to support multiple languages.
3. Compliance and Accessibility – app pages are XHTML, WCAG 2.0 AA complaint. Unfortunately, SharePoint still categorize browsers on two levels. - Level 1 and 2 browser support. Level 1 browsers are: IE7, IE8, FF – all 32bit browsers where 100% of functionality is guarantee; Level 2 browsers are IE7-IE8 x64, Safari, FF on other platforms, with some limitations in rendering and behaviour. IE6 is not supported
4. Validation of List and Libraries – each item in a list or library now supports item-level and list-level validation. For instance, a list owner can configure a validation to disallow the start date of an event item, stored in one column, to be after the end date of the event, stored in another column
5. Office Web Services - SharePoint 2010 features rich out of the box integration with Web versions of the most popular Office client applications so people can access documents, spreadsheets, presentations and notes without worrying the machine they are on has the latest Office client installed
6. Old Look and Feel - the stadard 2007 theme is supported, and is defaul when you perform migration from SharePoint 2007
7. [new] Themes no longer exist in Windows SharePoint Services "14" and Microsoft SharePoint Server 2010, so any customizations and design work that you have done with themes will not be imported into the new interface
8. [new] Two way of UI changes – customization of UX or simple via API that become possible with SharePoint 2010
9. [new] Office Web Services is a replacement for the Office client and installing on the top of SharePoint 2010 to provide all functionality of the Office 2010 over the Web, thus allowing users to collaborate and edit documents interactively together.
10. [new] 10 New and 4 removed Templates - the following templates have been added to SharePoint 2010: GroupBoard, Visio Process, Bugs, Charitable Contributions, Projects, Enterprise Seach Center, Basic Search Center, FAST Search Center, Enterprise Wike . The next ones have been removed: Site Directory, Search Center with Tabs, Search Center, Collaboration Portal
11. [new] Validation of the user’s input into list columns (formula based)
12. [new] Configuration Wizards in Central Administration simplify the most popular command actions, for example – Farm Configuration Wizard
Customers familiar with the previous version of SharePoint will notice some major changes to the user interface in SharePoint 2010. The new changes are:
List Changes
SharePoint 2010 introduces the following changes to the List:
• List items now display in a screen overlay pop-up.
• New events - WebAdding, WebProvisioning, ListAdding, ListAdded, ListDeleting, ListDeleted
• Site Collection events
• Synchronous "after" events to perform post-processing
• Custom error pages
• New property PSEventPropertiesBase to store the user name and token of the person who triggered the effective action
• New integrity constraints based on the lookup
• Projected Fields - fields from the parent which are referenced and displayed in the child list
• Lists Join - via LINQ, CAML, SharePoint Designer and API (SPQuery.Join and SPQuery.ProjectedFileds)
• Max 50M items under the read scenario
• List query size threshold - return warning or exception of query result exceeds threshold number of records
• Threshold pre-set is 5000 items for the normal user and 20000 items for the Super User
• List Administrators are notified when lists exceed threshold
• List constraints - max 8kb of data per list item (excluding attachments), 6 projected fields on joins (except using the view fields)
• Columns can be flagged as UNIQUE (must be indexed)
• Columns can be validated using custom field or by other fields
Content Management Changes
SharePoint 2010 contains a robust list of rich features that brings ECM to more people within an organization. Most notably is the fact that many records management capabilities in the previous version of SharePoint that were locked to specific site templates are now encapsulated in Features enabling their use in any SharePoint site.
1. Managed Metadata – The ability to centrally define taxonomies that can be leveraged within and across farms to classify and find content quickly.
2. Unique Document IDs – The ability to assign a document a unique identification number people can use to retrieve the document later even if it is moved
3. Document Sets – The capability to group multiple work items into one consolidated atomic work product. Document Set share the same metadata and the entire Document Set can be versioned as a whole and downloaded as a compressed ZIP file with all the contents. Each Document Set has a Welcome Page which displays the metadata shared across all documents in the set as well as a list of all documents. People can customize the Document Set Welcome Page as any other Web Part Page to meet the current business requirements

4. Advanced Routing – The ability people to submit documents to SharePoint sites and let the system determine which library and/or folder it should be saved to using the document's metadata and other rules.
5. In-Place Records Management – The capability that enables a document to be flagged as an official file or record, thus prohibiting any future changes, within collaboration sites. These official records can reside within the same document libraries that contain other documents people are collaborating on.
6. Web Content Management – The capability to host a content-centric site consumable by people with minimal or no collaboration complete with a robust publishing workflow ensuring only the privileged people have permissions to add and edit content on the site.
7. Searching by metadata tags - for content based on metadata breaks down the boundaries of folders, lists and document libraries, sites and site collections.
8. Metadata is extracted from images - metadata is by automatically extracting and promoting metadata from images uploaded to the central Asset Library. This includes details such as EXIF data and other details stored with images. This metadata can be used by people in search queries or when browsing the Asset Library using specific criteria
9. Auto Metadata Tagging - folders within lists and libraries can be configured to automatically tag content with specific metadata such as adding a "year=2010" tag to all documents within the "2010" folder.
10. Content Rating - people vote for which content is more helpful than others. SharePoint 2010 includes a content rating capability that can be leveraged in search queries or custom search solutions to find the most popular content as defined by the people in the organization
11. Content Organizer feature you can define a set of rules and have SharePoint route the documents automatically (like it happened for records management, but now for all documents).
12. Content types sharing – content types can be shared across sites, web applications and farms
13. External Content is supported via External List of SharePoint 2010 and External Columns (you can use existing list + attach the external content)
14. Social data in User Profiles - In Microsoft SharePoint Server 2010, user profile service facilitates a user applying social data on a URI. This is happening via Web services protocol [MS-UPSSDSP] that attaches social metadata to the corresponding URI. A user can select, for example, a document or an arbitrary URL and attach additional social metadata to the URL. Some common scenarios for using metadata include:
o The ability to “rate” a document or content or person
o Add a note or comment to content
o The ability to bookmark content with some pre-defined keywords, such as “a favorite”
o Add tags to the content, to categorize content or highlight with colleagues In case of bookmarks and tags, user profile service works with the Content Management Service to store the value of the tag, and the user profile service database only stores the corresponding GUID.
o For all forms of metadata, four key pieces of information are stored in the user profile service database
15. who added the metadata – that is the record identifier of the user in the profile store
16. when was it added – that is a timestamp
17. where it was applied – that is the URI
18. what social metadata it is – for rating it?s a number ranging from 1-5, for note its the text of the note, and for tags and bookmarks, its the GUID returned from the Content Management Service.
19. Sets - SharePoint Server 2010 drives "Vocabulary" by term sets stored and managed by the term store defined in the Content Management Service. This allows a term set administrator to define centrally controlled terms with full benefit of other functionality implemented by the Content Management Service.
20. Multi-user Collaboration environment - provides multiple users with the ability to edit any workbook simultaneously. (When user is active, the polling rate is determined by an adaptive algorithm executed on the ECS. All edits are processed in the order in which they are received by the ECS so the last edit overwrites any previous edit to the same workbook cell)
21. Content Type Hub , which is a single site collection to store content types, driven by Managed Metadata Service Application. Any web application can subscribe to this service application and thus use the content types and columns defined by the hub
22. Collaboration site should be in the separate Web Applicaiton and Content DB
23. All site collections for a single site subscription must reside on the same farm , but can be spread across Web applications.
24. Can show all lookup columns in parent list .
25. Hierarchical taxonomy across the entire Farm
26. Folder level granularity of complience
27. Send documents to multiple Record Management Centrers via ".Send To" menu
28. Retention policy per content type, libraries and folders
Software Development Changes
1. Upgradable features – can be easily upgrade via code and API available to query features
2. Sandbox isolation – you can deploy features to site collections in “Sandbox” mode, and solution won’t affect other sites. You can deploy a Web Part to a SharePoint site and have it run in the context of that site either in an on-premises instance of SharePoint or in the cloud using the hosted version of SharePoint. The limitation is by site collection scope.
3. Customizable upload page – you can use “CustomUploadPage” class to create your own _layouts\upload.aspx
4. New types by namespace in Microsoft SharePoint Server "14 (add picture)
5. The new Microsoft.SharePoint.Linq namespace , which defines a LINQ to SharePoint provider that translates LINQ queries into Collaborative Application Markup Language
6. Standardized Windows SharePoint Package (WSP) package .
7. The Client Object Model enables to access SharePoint objects through a referenced DLL as opposed to Web service calls
8. Save site as WSP – is helpful for prototyping
9. You should recompile custom code written for Office SharePoint Server 2007 if your solution includes a feature receiver that implements FeatureInstalled, FeatureUninstalling, FeatureActivated, and FeatureDeactivating
10. Microsoft SharePoint Server 2010 contains more than 1,500 deprecated types , most in the Microsoft.SharePoint.Portal
11. User Code Execution Service - Microsoft SharePoint Server 2010 implements a capability to securely host custom solutions and executable code that comes from customers of the system. It provides better controls for the security of execution of custom code, as well as mechanisms to monitor and control the usage of resources by that code.
One requirement of these mechanisms is to move the execution of the code to separate processes and separate servers, to provide better layers of isolation and monitoring. Therefore, two roles are defined in a user code execution process: a front-end Web server which initiates requests to run user code on behalf of a user, and a code execution back end service which fulfills the execution request. Communication between these servers is specified via the User Code Execution Protocol specification ([MS-SPPTC]).
12. Thee object models - managet .NET API, Silverlight Object Model, JavaScript & ECMAScript library
Functional Changes
1. No SSP – the new model of Serviced Applications replace the deprecate SSP in SharePoint 2010. The Service application architecture allows a set of services to be associated with a given Web application and a different set of services to be associated with another Web application (By publishing a service application, it can be shared across server farms)
2. The BCS is actually a platform that provides a SharePoint-based framework for creating Office Business Applications, or OBAs. BDC Entites became “external content type (ECT) “. Business data can be exposed as Office Word document properties and can be inserted into documents. Users can interact with business data using the familiar Outlook interface, and take the data offline using the new SharePoint Workspace
3. Claims based Identity , a system to describe, trust, and act on the identity of users accessing SharePoint. It is a capability that exists in addition to Windows based Authentication (NTLM/Kerberos). SharePoint Server 2010 Technical Preview implementation of Claims based Identity is standards based. Customers deploying SharePoint Server 2010 Technical Preview, can use any protocol or service that implements these standards to provide Identity to SharePoint. In addition, when applications running on SharePoint need to make external Web service calls, SharePoint will issue a SAML token that identifies the user and application pool identity. For more information on Claims based Identity standards, see [WSTrust], [WS-Security], [WSFederation] and [SAMLToken1.1]
4. Composition Application that allows to connect to external data using SharePoint Designer 2010 to create an external content type. This external data can now be leveraged within the Office clients such as Word or Excel. Custom task panes in Outlook can use this data from external line-of-business applications to augment a person's contact card when selected such as their company's recent orders, etc.
5. User profile service export data back to Active Directory and Lightweight Directory Access Protocol (LDAP). In Microsoft SharePoint Server 2010, a user profile service administrator can define properties that will be exported back to the Active Directory. A popular scenario for the export functionality is to send a user’s picture back to be stored in Active Directory
6. Visio 2010 - you can create workflows in Visio 2010 and export them into SharePoint Designer 2010 to add business logic and additional rules
7. Internal SharePoint Designer
Backup/Recover/Upgrade Changes
1. New upgrade scenarios - SharePoint Server 2010 has several features that have been introduced that allow for upgrade scenarios to occur with little to no outages and at the same time allow for quicker upgrade windows.
The first feature is the use of read-only databases which was made available starting with Office SharePoint Server 2007 service pack 2. SharePoint Server 2010 now recognizes a content database has been made read-only from with-in SQL Server and will trim the UI as if all site collections were marked read-only. This allows users read access to the content while the upgrade takes place.
2. Patching improvements . The patch management UI and patch reporting cmdlet allow for the monitoring of patches throughout the farm. There are also patch status health rules that will alert an administrator to inconsistencies
3. Granular Backup/Restore from Central Administration (not only vis STSADM) – including recovery single document
4. Recover data from unattached content database - you don't need to attach content database backup to the SQL Server to recover data from there
5. Browse the content of a content database that is attached to a SQL server but not associated with SharePoint Server
6. Automatic Failover
7. Workflows are not Imported/Exported - when you export/import your Site WorkFlows won't be included, you need to move them manually
Web Services Changes
SharePoint 2007 Web Services model provided limited functionality to manage SharePoint farm over the web model. The reason of this is that SharePoint 2007 was considered as a stand-alone product, without Web 2.0 features and Cloud services. In nowadays, we are moving to Online services and rich Web Services model is one of the requirements for all products we are using, especially for enterprise wide applications that can be scaled globally.
The release of SharePoint 2010 takes into account Web 2.0 and Cloud trend and exposes all new functionality that is exposed not only via SharePoint API, but via Web Services, WCF model and JSON protocol.
Microsoft direction is to provide you rich web API to expose all stand-alone power of SharePoint over the wire.
SharePoint 2010 Web Services were refactored completely to incorporate all power and flexibility of WCF 4.0 technology. New functionality is provided via Web Service mode, as WCF services and supports JSON protocol for Web 2.0 integration
All services are exposed over the same URL patterns:
- Administrative services: http:// : /_vti_adm/Admin.asmx
- Site services: http:// : / /_vti_bin/ .asmx
Howerver, all new MSS2010 functionality (services) are exposed over additional Web Services, that have new URLS like: http:// : / /Admin.asmx
Changes in existing Web Services
There are few services that were updated to provide additional method.
Lists
The list services provides functionality to work with the List libraries

Sites

The "Sites” Web Service provides new methods to manage SharePoint sites (workspaces). Previously, in SharePoint 2007 you can't create workspaces for the root site via Web Services. But now, SharePoint 2010 extends Web Service model and provides methods to manage Workspaces.
With the new method you can get the Web Application ID, create SharePoint Workspace, export site schema as deployable cab file and delete the Workspace, for example use the following snippet to create new “ws2010changes” Team Site beneath the current site with the anonymous access.
siteService.CreateWeb("ws2010changes", "WS2010Changes", "MSS2010 Web Services changes samples", "STS#0", 1033, true, true, true);
CreateWeb method has the following signature (from autogenerated WS classes)
object[] results = this.Invoke("CreateWeb", new object[] {
url,
title,
description,
templateName,
language,
uniquePermissions,
anonymous,
presence});
Site Data

Webs

Form Services

Excel Services

Official File

Search

User Profile Services

Web Part Pages

Site Changes
SharePoint 2010 Site Changes
1. Role/Rule based Audience Targeting – added rules-based audiences, WSS groups and distribution list membership.
2. Sites are collection of pages - SharePoint 2010 sites became more page-focused rather than a collection a lists. Sites still contain the same list and libraries as previous versions of SharePoint, but the site is now a collection of pages.
3. Pages are optimized for Reading – all WCM pages are optimized for the reading, rather than for the writing, thus performance is increased significantly
4. Status updates and activity feeds of My Sites – SharePoint 2010 changes of My Site enhanced dramatically to be the social networking hub. One of such changes is ability to update your status, similar to Facebook. See the following screenshot

5. Social tagging - assignment of descriptor words or categories to that content. There are two types of tagging, social tagging and expertise tagging. Social tagging refers to content and adds metadata to content to describe what it is, what it contains, or what it does. Expertise tagging is related to a person and describes the person, such as what they do, which projects they work on or what skills they have. Where social tagging of content allows users to organically flex and grow a portal’s information architecture over time, expertise tagging helps build relationships and connections to other people in the organization.
6. Team blogs which allows multiple people to publish blog posts together
7. New Lists - Assets Library (list to share and manage rich media assets such as image, audio and video files) , External List (list whose data source is an Enterprise Entity)
8. Site templates are deprecated in SP2010. But, "Save Site as Template" will create a solution package with a .wsp file name extension
9. [new] Improved performance and management of large lists . List item limitation has been removed – 1 million items for 3 secs. Windows SharePoint Services "14" and Microsoft SharePoint Server 2010 apply a default query threshold of 5,000 items. Any custom code that relies on query result sets that can exceed this maximum will not behave as expected. Queries on lists consisting of more than 5,000 items that include non-indexed fields in their query conditions will also fail, because those queries must scan all rows in a list. You can increase this limit or enable the object model to override it on the Central Administration site (under Application Management, click Manage Web Applications, click General Settings, and then click Resource Throttling
10. Lists support external data , can return results as DataTable; support calculated field rule validation and no more even’t receivers
Search Changes
1. Three ranges of search – Search Server 2010 (Entry Level), OOTB Seach, (Infrastructure), and FAST Search (high-end). FAST will be licensed through our Enterprise CAL (for internal search) with an additional server
2. No more 50 millions items limitation - FAST provides powerful capabilities to index hundred millions items, so no more SharePoint 2007 index limitations
3. Query syntax – can use AND, OR, NOT keywords in search query
4. Wildcard search - using * in search query
5. Faceted search/Refinements – refinements are shown in the panel to filter the results (by tags and metadata). This funtionality is supported in the Standard edition and above
6. New search Web Parts - many search-related Web Parts that enable power users to create customized search experiences that implement automatic filtering, best bets, a refinement panel, featured content or offer pre-defined queries
7. Social people search - phonetic name matching (returns names that sound similar to what the user has typed as a query & all variations of common names, including nicknames); exploring results via name, title, and expertise; include real-time presence through Office Communication Server
8. Social distance - SharePoint builds a model of your regular interactions based on e-mail conversations and group memberships, which it uses to organize people search results based on social distance - a direct colleague will appear before someone 3 degrees removed.
9. Index Partitioning - SharePoint Search supports partitioning the index and having multiple indexers that can be aggregated together
10. Query Partitioning - Each query partition can contain up to ~10 million items, and can also be “cloned” by deploying multiple instances of a given query partition across several query servers. Query throughput increases when you add query partition instances.
11. FAST Search replacement - The new architecture scales up to approximately 500 million items, and search can be utilized in a multi-tenant hosting environment.
12. Crawling Service - Multiple crawlers can be used simultaneously to crawl different content during each crawl cycle. This improves performance and can also provide redundancy. All crawling information is stored into “property database”.
13. Cross-farm search service that allows farms to connect to multiple farms to consume cross-farm data
14. Metadata index is expose via search
15. Search Server doesn't support people search - this functionality is available only in SharePoint 2010 OOTB Search
16. FAST Search services in 2010 means that ingesting structured data from external Line of Business applications is much easier in FAST Search for SharePoint. More details are there
Database Changes
SharePoint 2010 database model has been changed significantly in the way of distributing data across several databases that makes horizontal distribution of SharePoint 2010 solutions very feasible.
There are three areas of changes - architecutre changes, new databases and new tables.
Architecture Changes
SharePoint 2007 stored all content in large tables (for example lists, site collects end etc were represented as a huge table), and the performance were affected by SQL Server locks, especially in the large collaborative projects, when a lot of people use the same content and SQL Server locked the table, so no one can work till person generated the lock release the content (SQL Server 2005 suffered from this very much, because its internal behavior tends to lock table when 2000+ items are selected). I posted several tips, explaining such behavior (see tip #29)
Thus, you were limited with 2000 items in List and should use several Site Collections in case of large collaborative community.
SharePoint 2010 changes solved those issue - moving content from the singe tables into different tables. Such changes allows you to store million items in the lists (yep, we are step close to ECM requirements I blogged earlier) and have very intensive collaborative project in one Site Collection.
100 GB "recommendation" on the Content Database size is not an issue any longer.
New Databases
SharePoint Shared Services became deprecated in SharePoint 2010, and instead we have new Services architecture, where all services are independent from each other. Such architecture affected the way information and configuration are stored and each services has it's own database.
Previously, with SharePoint 2007 we had at least 6 databases for each installation
1. Central Administration - [SharePoint_AdminContent ]
2. Configuration - [SharePoint_Config]
3. SSP - 3 databases for SSP settings, MySites, and Search
4. Web Application - custom database
With SharePoint 2010 model we still have Central Administration and other databases, but instead of point 3 we end up with the separate database for each Service, for example [AccessServices], [MetadataServices], [WebAnalyticsReporting] and etc. So, we can easity have 15 databases only for the simple SharePoint 2010 solution.
[new] User Profiles use 3 databases: [Profiles] - for the actual profile content, [Syncronization] to keep configurations of the extenal data and [Social Tagging] to store tags and noted created by users
SharePoint Configuration Database Changes
There are several changes of the tables in the SharePoint Configuration database. The following tables have been added:
1. AllFileFragments
2. AllListAux
3. AllListPlus
4. AllListUniqueFields
5. AllLookupRelationships
6. AllWebParts (Renamed from WebParts)
7. CustomActions
8. Resources
9. SharedAccessRequest
10. SiteDeletion
11. SolutionResourceUsageDaily
12. SolutionResourceUsageDailyOriginal
13. SolutionResourceUsageLog
14. SolutionResourceUsageLogWindowed
15. Solutions
16. WebsPlus
Removed Tables:
1. Categories
2. Image0x
3. WebCat
Monday, July 19, 2010
Publishing Infopath forms through sharepoint central admin level
1)After completion fo creating infoapth form
Go to-->Tools-->Form Options-->
Under the compatability-->
Select design from tempalte taht can be open in browser or infopath
give below url in the text box
http://sharepoint:9999(Sharepoint site)
Click OK
2) Go to File -->Publish
Next-->Enter the sharepoint location or URL
http://sharepoint:9999
Next-->should be automatically select Enable this form to be filled out by using a browser option (Because we have enabled compatability optiono in first step)
Next-->we can get browse option where we have to store the infopath as a tempalte(.xsn form) ex:desktop and we ahve to give the name of the template.
Next-->Add the columns the fileds avaialble in infoapth (There columns will come automatically after publishing in sahrepoint list)
while adding columns if we select allow users to edit column option that column can be used to change value for that column while working from infoapth path or some where.
Next-->Publish-->Close
It will come in the desktop with the name test.xsn (because we have selected desktop to publish and gvien test.xsn name)
Deploying in to the Sharepoint site.
After getting the tempalte
Go TO Central admin Site-->
Applcaition management-->InfoPath Forms Services-->
Manage form temapltes-->
Uplaod a form template--> select out test.xsn form from the desktop-->
Click Upload
After uploading-->Click on dropdown box for form what you have uploaded-->
select active to site collction-->
select our sharepoint site where we need that infopath form-->
Click ok->
Now to go to our sharepoint site-->
Go to Form library--> Form library Settings-->
Adavanced option-->Select allow managemetn of content types to Yes->
and select openinig browser enabled documents to Dispaly as a webpage-->
click ok-->select add frome xisting content types from under content types section-->
in the content type list we can find our content with the name test-->select test and click on add-->click on ok-->
now you can find our custom content type or form in list-->
Click on New dropdown--> you can find your form or content type.
Installing and Activating the Feature
Installing Feature
Start-->Run-->cmd
cd C:\Program Files\Common Files\Microsoft Shared\web server extensions\12\BIN>
C:\Program Files\Common Files\Microsoft Shared\web server extensions\12\BIN>stsa
dm.exe -o installfeature -name DemoFeature -force
DemoFeature :Feature fodler name in the /features
Activating Fature
2 ways we can activate feature
1)From comand promt
2)from sharepoint site
From command promt:
C:\Program Files\Common Files\Microsoft Shared\web server extensions\12\BIN>stsa
dm.exe -o activatefeature -name DemoWorkflowfeature -url http://jagadeeshv:9999
-force
From Sharepoint site:
Site actions--> if scope="web"
find site features
if scope="Site"
go to Site collection features
Find Feature title and click on activate
Finding List ID in sharepoint
•Navigate to the SharePoint list using the browser.
•Select the Settings + List Settings menu command.
•Copy the Url from the browser address bar into Notepad. It will look something like:
http://moss2007/ProjectX/_layouts/listedit.aspx?List=%7B26534EF9%2DAB3A%2D46E0%2DAE56%2DEFF168BE562F%7D
•Delete everying before and including “List=”.
•Change “%7B” to “{”
•Change all “%2D” to “-“
•Chnage “%7D” to “}”
You are now left with the Id:
{26534EF9-AB3A-46E0-AE56-EFF168BE562F}
Creating Event receiver as a Feature for Sharepoint List
1)Go to The below path
C:\Program Files\Common Files\Microsoft Shared\web server extensions\12\TEMPLATE\FEATURES
2)Create New Folder name called like
3)IN that folder Create two xml files
a)Feature.xml
b)Elements.xml
Note:(if you dont have option to create xml you can create .txt and rename like Feature.xml)
4)Open Feature.xml file and write the below code.
Scope="Web"
Title="EventReceivers_TempTasks"
Hidden="FALSE"
Version="1.0.0.0"
Description="Activate Feature">
In the above code
ID=New GUID(you can create new guid using visual studio--> tools-->GUID
Scope=Creating feature for scope of the sharepoint portal ,whether it is sitecolection or subsite. If it is "Web"-->Avalable for subsite
"Site"-->Available for site collection
Title=Title of the Feature Name it will display while activating
In the Elements manifests we will add elemensts avaialble in that feature.
In this example we have only one elemensts.xml
if we have two elements.xml files we need to add that elements as like below
Note:The name of the element file name might have any name like sample.xml or test.xml
5)Save and close Feature.xml file
6)open the Elements.xml file and write the below code
ItemAdding
ItemAdding
10001
DemoEventReceivers, Version=1.0.0.0, Culture=neutral, PublicKeyToken=d4e8eb189dba459d
DemoEventReceivers.ClassName
In the above code we are writing event for type tasks List,
Type of ID for Tasks is "107"
ListTemplateOwner is event for particular list Here we will mention list ID
ListTemplateOwner="{D8632C31-D30F-4749-857E-ADFBA1BC4751}"
(Note:Finidng list ID:)
Type: event for list
:Event recevier(Dll) for the list
(Note:Creating dll for the list
)
7)Save and close elements.xml
Creating Feature is complete
To Install and Activate Feature
C:\Program Files\Common Files\Microsoft Shared\web server extensions\12\TEMPLATE\FEATURES
2)Create New Folder name called like
3)IN that folder Create two xml files
a)Feature.xml
b)Elements.xml
Note:(if you dont have option to create xml you can create .txt and rename like Feature.xml)
4)Open Feature.xml file and write the below code.
Scope="Web"
Title="EventReceivers_TempTasks"
Hidden="FALSE"
Version="1.0.0.0"
Description="Activate Feature">
In the above code
ID=New GUID(you can create new guid using visual studio--> tools-->GUID
Scope=Creating feature for scope of the sharepoint portal ,whether it is sitecolection or subsite. If it is "Web"-->Avalable for subsite
"Site"-->Available for site collection
Title=Title of the Feature Name it will display while activating
In the Elements manifests we will add elemensts avaialble in that feature.
In this example we have only one elemensts.xml
if we have two elements.xml files we need to add that elements as like below
Note:The name of the element file name might have any name like sample.xml or test.xml
5)Save and close Feature.xml file
6)open the Elements.xml file and write the below code
In the above code we are writing event for type tasks List,
Type of ID for Tasks is "107"
ListTemplateOwner is event for particular list Here we will mention list ID
ListTemplateOwner="{D8632C31-D30F-4749-857E-ADFBA1BC4751}"
(Note:Finidng list ID:)
Type: event for list
(Note:Creating dll for the list
)
7)Save and close elements.xml
Creating Feature is complete
To Install and Activate Feature
Creating Event for List Item using event receiver(SPItemEventReceiver) Class
1)Create Class Library project using visual studio
2)Add reference-->browse
C:\Program Files\Common Files\Microsoft Shared\web server extensions\12\ISAPI
select Microsoft.sharepoint.dll
3)Add namespace
using Microsoft.SharePoint;
4)Inherit SPItemEventReceiver class like below
public class EventReceiversForDemolistinCMS:SPItemEventReceiver
{
}
5)Override Method properties as per our requirement.
public class EventReceiversForDemolistinCMS:SPItemEventReceiver
{
public override void ItemAdding(SPItemEventProperties properties)
{
}
public override void ItemAdded(SPItemEventProperties properties)
{
}
public override void ItemUpdating(SPItemEventProperties properties)
{
}
public override void ItemUpdated(SPItemEventProperties properties)
{
}
public override void ItemDeleting(SPItemEventProperties properties)
{
}
public override void ItemDeleted(SPItemEventProperties properties)
{
}
}
6)Here i am taking simple example.I want to raise event for an item when item is added in the list.For that i will override Itemadded event as live below.
public class EventReceiversForDemolistinCMS:SPItemEventReceiver
{
public override void ItemAdding(SPItemEventProperties properties)
{
string strtemp = properties.AfterProperties["Status"].ToString();
if (strtemp != "Completed")
{
properties.ErrorMessage = "Status should be completed";
properties.Cancel = true;
}
}
}
In the above above code getting the value of Status column field while adding item to the list.
properties.AfterProperties["Status"].ToString(); //IT will get Status filed value after ading value in the column.
In the Condition it is checking Status value ,If status value is equal to Completed it will add item to the list,If status couln is not equal to Completed it will raise an error.
7)Add Strong name to the project
right click on project-->properties-->signinig-->
select sign in assembly-->click on dropdown-->New ->any name-->un select protect my key with password-->say ok
8)Build the applciation
9)Find the dll by opening contaiing folder-->bin/debug path
10)Place in GAC
Adding eventreceviers as a feature
Introduction
What are Event Receivers?
SharePoint 2007 Event Receivers are a type of feature which listens for certain events on a site, list or list item. Event Receivers are the MOSS version of document event handlers (also known as Event Sink) in SharePoint V2 technologies (WSS and SPS). Previously the document event handlers were only available for document libaries. Event receivers are now available for any type of list.
What can they be used for?
SharePoint 2007 Event Receivers add behaviours to lists or list items. They are commonly used to perform data validation (beyond SharePoint standard capabilities), to ensure data integrity or to perform a business process.
Definition
Event Receivers have before and after events.
The events relating to a site are:
Before
SiteDeleting
WebDeleting
WebMoving
After
SiteDeleted
WebDeleted
WebMoved
A class needs to inherit from SPWebEventReceiver. The behaviour is defined by overriding a method for one of the above before or after events. You can access properties that relates to the event that the feature is listening using SPWebEventProperties.
The events relating to a list are:
Before
FieldAdding
FieldUpdating
FieldDeleting
After
FieldAdded
FieldUpdated
FieldDeleted
A class needs to inherit from SPListEventReceiver. You define the behaviour by overriding a method for one of the above before or after events. You can access the event properties using the parameter SPListEventProperties.
The events releating to list items are:
Before
ItemAdding
ItemUpdating
ItemDeleting
After
ItemAdded
ItemUpdated
ItemDeleted
ItemAttachmentAdded
ItemAttachmentDeleted
ItemCheckedIn
ItemCheckedOut
ItemFileConverted
ItemFileMoved
ItemUncheckedOut
A class needs to inherit from SPItemEventReceiver. You then override a method for one of the above before or after events. The event properties can be accessed by the local parameter SPItemEventProperties. One of these is the list item. For example:
public override void ItemAdded(SPItemEventProperties properties)
{
SPListItem currentListItem = properties.ListItem;
// other implementation here .....
}
Other important information of the properties object is the AfterProperties and BeforeProperties. AfterProperties provide access to the modified properties. BeforeProperties provide access to the column data before it was changed. This enables you to perform changed based validation.
Sunday, July 18, 2010
sharepoint 2010 key features
Key Features•
New User Interface including new Ribbon
•Web Edit
•Silverlight Web Part
•Rich Theming
•Multiple Browser Support
•Visio Services
•SharePoint Designer
•Business Connectivity Services (the evolution of the Business Data Catalog)
•SharePoint Workspace
•Rich Media Support
•Central Administration
New User Interface including new Ribbon
Ribbon interface is contextual and customizable which means you will get an extra Library Tools Tab when you are in a SharePoint document library.
Document Library Tool bar

Edit mode tool bar
Image change and formatting tool bar
This will allow users to select multiple files and perform checkout / check in actions.

Web Edit
Edit your web page directly and get a live preview which is same as office client. This allows you to change common things such as images and text a lot easier than the current one.
Edit Page mode on 2010 and 2007


Live preview same as office client

Change Font Size which provides you with a live preview on font size.

Change images, allow you select images from your PC or from Internet Address and also allow you to select resize the image by drag and drop.

Silverlight Web Part
SharePoint 2010 out of the box comes with Silverlight webpart which allows users to view an interactive rich text content.
New interface to select Webparts:

Silverlight webpart which allow you to Zoom In/Out the content:

Rich Theming
Change SharePoint site's look and feel using PowerPoint themes:

PowerPoint themes preview and color with different font sizes:

Upload the PowerPoint themes you are able to select as SharePoint site theme, then select colour palate display for your preview.

By clicking apply theme, SharePoint site changes to news theme.

Multiple Browser Support
SharePoint supports multiple browsers such as Internet Explorer, Firefox and Safari.

Visio Services
Allows to publish Visio diagrams directly to SharePoint and using browser you can Open Visio diagrams. No Visio client Installation is required.

SharePoint Designer 2010
SharePoint Designer 2010 new UI, enhanced modelling capabilities and improved workflow capabilities makes designers and developers to collaborate seamlessly.

In SharePoint Designer 2010, you will see a new concept Entities handle the back-end integration. SharePoint provides seamless integration with back-end systems.

Central Administration
New improved Central Administration screens...


New User Interface including new Ribbon
•Web Edit
•Silverlight Web Part
•Rich Theming
•Multiple Browser Support
•Visio Services
•SharePoint Designer
•Business Connectivity Services (the evolution of the Business Data Catalog)
•SharePoint Workspace
•Rich Media Support
•Central Administration
New User Interface including new Ribbon
Ribbon interface is contextual and customizable which means you will get an extra Library Tools Tab when you are in a SharePoint document library.
Document Library Tool bar

Edit mode tool bar

Image change and formatting tool bar

This will allow users to select multiple files and perform checkout / check in actions.

Web Edit
Edit your web page directly and get a live preview which is same as office client. This allows you to change common things such as images and text a lot easier than the current one.
Edit Page mode on 2010 and 2007


Live preview same as office client

Change Font Size which provides you with a live preview on font size.

Change images, allow you select images from your PC or from Internet Address and also allow you to select resize the image by drag and drop.

Silverlight Web Part
SharePoint 2010 out of the box comes with Silverlight webpart which allows users to view an interactive rich text content.
New interface to select Webparts:

Silverlight webpart which allow you to Zoom In/Out the content:

Rich Theming
Change SharePoint site's look and feel using PowerPoint themes:

PowerPoint themes preview and color with different font sizes:

Upload the PowerPoint themes you are able to select as SharePoint site theme, then select colour palate display for your preview.

By clicking apply theme, SharePoint site changes to news theme.

Multiple Browser Support
SharePoint supports multiple browsers such as Internet Explorer, Firefox and Safari.

Visio Services
Allows to publish Visio diagrams directly to SharePoint and using browser you can Open Visio diagrams. No Visio client Installation is required.

SharePoint Designer 2010
SharePoint Designer 2010 new UI, enhanced modelling capabilities and improved workflow capabilities makes designers and developers to collaborate seamlessly.

In SharePoint Designer 2010, you will see a new concept Entities handle the back-end integration. SharePoint provides seamless integration with back-end systems.

Central Administration
New improved Central Administration screens...


Wednesday, July 7, 2010
Hiding List columns in newsform.aspx/editform.aspx/dispform.aspx
Open newform.aspx
To get webpart properties to panel add below command to URL
http://sharepointkings/... /Lists/Demo/NewForm.aspx?RootFolder...&Source=…&ToolPaneView=2
Add Content Editor webpart
open source editor and add below code

repalce HideField("Workspace"); with your filed name like HideField("Due Date");
cehck now....
Reference:
http://www.sharepointkings.com/2009/10/hiding-field-in-sharepoint-through.html
http://www.sharepointkings.com/2008/05/how-to-hide-column-of-sharepoint-list.html
http://www.sharepointkings.com/2008/05/how-to-edit-list-forms-like-newformaspx.html
Work flow to copy list item from one doucment library to another document library
To create a SharePoint Designer workflow that can move a document from one document library to another:
1.In SharePoint Designer 2007, open the SharePoint site on which the document
library that contains the documents to move is located.
2.On the File menu, select New, and then Workflow.
3.On the Define your new workflow screen of the Workflow Designer,
enter a name for the workflow, select the document library you want to attach
the workflow to (this would be a document library containing documents to move),
select Allow this workflow to be manually started from an item, and click Next.
4.On the Step 1 screen of the Workflow Designer, click Actions, and then click More
Actions from the drop-down menu.
5.On the Workflow Actions dialog box, select List Actions from the category drop-
down list box, select Copy List Item from the actions list, and click Add. The
following text is added to the Workflow Designer:
Copy item in this list to this list
6.On the Step 1 screen of the Workflow Designer, click the first this list
(representing the document library to copy the document from) in the text of the
Copy List Item action.
7.On the Choose List Item dialog box, leave Current Item selected, and click OK.
8.On the Step 1 screen of the Workflow Designer, click the second this list
(representing the document library to copy the document to) in the text of the
Copy List Item action, and select the document library (this is the document
library to where you want to move the document) from the drop-down list box that
appears.
9.On the Step 1 screen of the Workflow Designer, click Actions, and then click
More Actions from the drop-down menu.
10.On the Workflow Actions dialog box, select List Actions from the category
drop-down list box, select Delete Item from the actions list, and click Add.
The following text is added to the Workflow Designer:
then Delete item in this list
11.On the Step 1 screen of the Workflow Designer, click this list in the text
of the Delete Item action.
12.On the Choose List Item dialog box, leave Current Item selected and click
OK. The final text for the workflow should now look like:
Copy item in DocLib1 to DocLib2
then Delete item in DocLib1
where DocLib1 is the SharePoint document library containing the document to move
and DocLib2 the document library to move the document to.
13.On the Step 1 screen of the Workflow Designer, click Finish.
Testing the workflow
1.Go to the SharePoint document library to which you attached the workflow,
click on a document, and select Workflows from the drop-down menu.
2.On the Workflows page, click the name of your SharePoint Designer workflow.
3.On the workflow initiation page, click Start.
When the workflow completes, the document should have moved from the first
SharePoint document library to the second document library.
http://www.documentmanagementworkflowinfo.com/sample-sharepoint-workflows/sharepoint-designer-workflow-move-document-one-library-next.htm
Infopath getting error Failed Connection to Data Source

Go to Tools-->Form options in infopath form menu
Select Security and Trust Category
Unselect Automatically determine security level(recomended)
select Full Trust option
click ok
Now Preview the infopath form you won't get that error.
Note:This error will come while getting or submitting data from sharepoint list ,If there is any dataconenction you can get that type of error.
Tuesday, July 6, 2010
TO open infopath form in browser while opening from task list related list item(sharepoint desigern workflow)
1)Open .aspx form in the workflow from Sharepoint designer
2)Find href tag
Replace
href="{substring-before(@WorkflowLink, ', ')}"
to
href="{substring-before(@WorkflowLink,',')}?OpenIn=Browser"
2)Find href tag
Replace
href="{substring-before(@WorkflowLink, ', ')}"
to
href="{substring-before(@WorkflowLink,',')}?OpenIn=Browser"
Subscribe to:
Posts (Atom)
Content Editor Webpart not showing up in SharePoint Online ------------------------------------------------------------------------------...
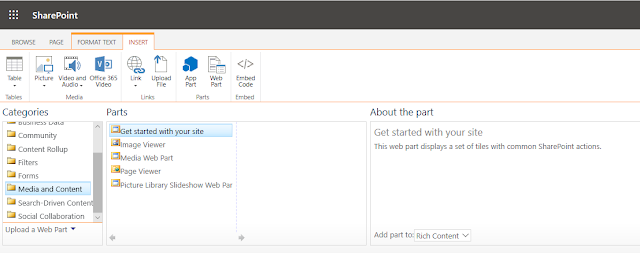
-
Category : Admin Backup : For site collection backup : stsadm.exe -o backup -url -filename [-overwrite] For catastrophic backup: sts...
-
 Content Editor Webpart not showing up in SharePoint Online ------------------------------------------------------------------------------...
 -
spWeb.RegionalSettings.LocaleId=1033(for US english)