Scenario: We build a cascading for Address List. We have three list: City, District and Ward
1. Create City List
- In SharePoint 2010, create a custom List and named as “City”
- Add Two Item to this list: Hanoi and TP HCM
2. Create District List
- In SharePoint 2010, create a custom List and named as “District”
- Create a Lookup column named as “City”. This column get information from City List in the column Title.
- Add 4 items to District list

3. Create Ward List
- In SharePoint 2010, create a custom List and named as “Ward”.
- Create a Lookup column named as “City”. This column get information from City List in the column Title.
- Create a Lookup column named as “District”. This column get information from District List in the column Title.
- Create on Add new Item link you will see. When we choose City, District still have 4 item.

4. Customize Ward form to meet cascading requirement
- In Ward List, click on Customize Form ribbon button

- System will automatically open the form template of Ward list in InfoPath Designer

- Right click on District drop-down list control then select Drop-Down List box Properties from menu to open the properties windows

- In Data Source. Click on Add button
- In Data Connection Wizard, click on Next button

- In Select the source of your data, choose SharePoint library of list then click Next button

- In SharePoint Site details screen, click on Next button

In Select a list of library, choose District the click on Next button

In select fields: Choose Title, City, ID then click on Next button

In next screen, choose Next button

- Leave the default name for the connection as “District1” then click Finish button

Now, You will see the Data Source of Drop-Down list box is District1

- In Entries section, click on the tree button to select XPath
- In Select a Field or Group dialog, click on Filter Data… button

- In Filter Data click on Add… button
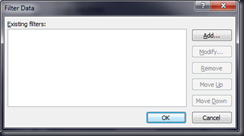
- In specify Filter Conditions, in the first drop-down list choose Select a field or group

Select a Field or Group opened. Select District1 as Data Source, choose City in dataFields then click OK

In specify Filter Conditions, in the last drop-down list choose Select a field or group

Select a Field or Group opened. Select Main as Data Source then choose City in dataFields then click OK

Click on OK to close specify Filter Conditions dialog
- Click on OK to close Filter Data dialog
- Click on OK to close Select a Field or Group
- In Drop Down List box properties, choose d:ID in Value: section then click OK to close this

- In InfoPath Designer, close the Windows then choose the Save and Publish button

- After Publishing complete, back to Ward list then click on Add new item link. You will see the result


Two drop-down list has been cascading.

No comments:
Post a Comment