Friday, July 26, 2019


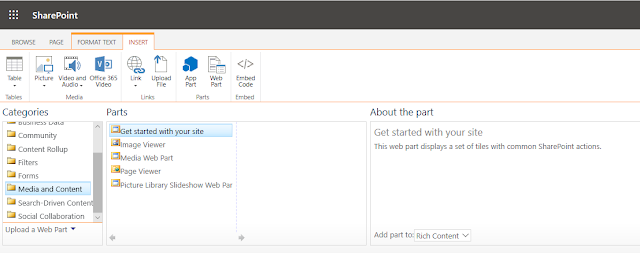
Content Editor Webpart not showing up in SharePoint Online
--------------------------------------------------------------------------------------------------------------------------

Problem :


Solutions :

1. Go to SharePoint Admin Center -https://XYZCOMPNAY-admin.sharepoint.com
2. Go to Settings --> Click on Can't find the setting you're looking for? Go to the Classic Settings Page.
3. Allow Custom Script 


It will be activated in 24 Hours.

If we want to activate immediate custom script , We have to enable it from Sharepoint Online Management Shell.

Activate Custom script from Sharepoint Online Mangement Shell :

Hope Sharepoint Management Shell already installed in the system.

PS C:\Windows\system32> Connect-SPOService

cmdlet Connect-SPOService at command pipeline position 1
Supply values for the following parameters:
Url: https://XYZCompany-admin.sharepoint.com
PS C:\Windows\system32> Set-SPOSite https://XYZCompany.sharepoint.com/sites/Development -DenyAddAndCustomizePages 0
PS C:\Windows\system32>


Thursday, July 25, 2019

Sharepoint Online Management Shell
-------------------------------------------------------------------------------------------------------------------------------------------------------------------------------------------------------


SharePoint online Management shell is a windows power shell module loaded with the share point libraries for share point online , and hosted on office 365 , it helps administrators to manage users , sites and site collections .

Powershell is highly effective and easy to use for managing SharePoint, Everything that can be done on SharePoint central administration can be done using power shell. 

As SharePoint hosted on office 365 , there have been limited options for SharePoint administrators to use power shell. How ever with the recently released SharePoint online management shell , it will be easy to manage SharePoint online from any remote computer. 

Not every command is available in SharePoint online compared with On-Premises , But it's a certainly a good start.

Install the SharePoint Online Management Shell


After installing the SharePoint Online Management Shell , To open the SharePoint Online Management Shell command prompt, from the Start screen, type sharepoint, and then click SharePoint Online Management Shell.

To connect with a user name and password

1. 1.    Fill in the values for the $adminUPN and $orgName variables (replacing all the text between the quotes), and then run the following commands at the SharePoint Online Management Shell command prompt:

PS C:\Windows\system32>   $adminUPN="sampleuser@xyzcompany.onmicrosoft.com"

PS C:\Windows\system32>  $orgName="xyzcompany"

PS C:\Windows\system32>  $userCredential = Get-Credential -UserName $adminUPN -Message "Type the password."

PS C:\Windows\system32>  Connect-SPOService -Url https://$orgName-admin.sharepoint.com -Credential $userCredential

2. When prompted with the Windows PowerShell credential request dialog box, type the password for the SharePoint Online SharePoint administrator account.


Ribbon missing in Share point online Pages to add custom web part :
--------------------------------------------------------------------------------------------------------------------------

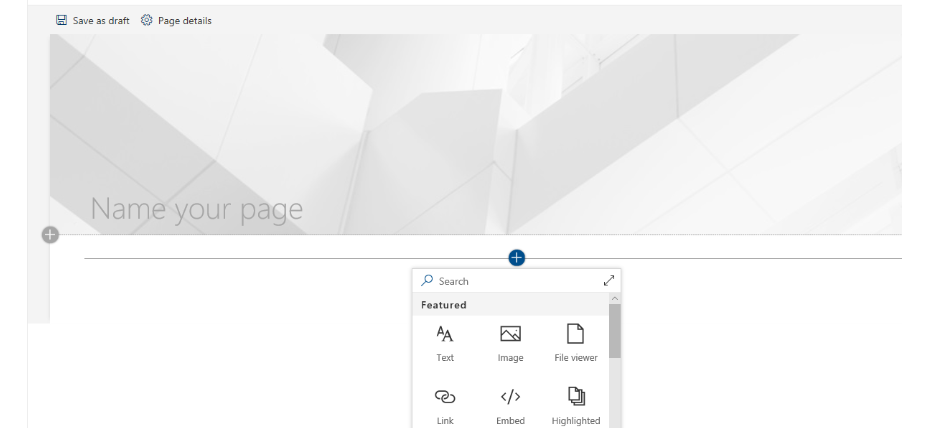
you can not see the ribbon if you create modern page or site page  in share point online.


Solution:

Create Webpart page or wiki page to see the the ribbon and Browser/page buttons


Wednesday, December 22, 2010

Getting ImageLink from sharepoint PictureLibrary and displaying in imagecontrol

using (SPWeb web =SPContext.Current.Site.OpenWeb())
{
SPList Projectimages = web.Lists["ProjectPictures"];
SPQuery myQuery = new SPQuery(); //CAML Query to get only images based on WbsId
myQuery.Query = string.Format("" + strWBSId + "");
// Get a collection of Items based on Query
SPListItemCollection Items = Projectimages.GetItems(myQuery);
if (Items.Count > 0)
{
foreach (SPListItem item in Items)
{
imgProjectImage.ImageUrl = string.Concat(web.Url, "/", item.Url.ToString());
imgProjectImage.Attributes.Add("style", "display:block"); //By default image display property was hidden,when the image is there in library then only we are dispalying that image
break;
}
}

}

Disposing SPWeb and SPList(SPObjects)

using (SPWeb web =SPContext.Current.Site.OpenWeb())
{
SPList Projectimages = web.Lists["ProjectPictures"];
SPQuery myQuery = new SPQuery();
SPListItemCollection Items = Projectimages.GetItems(myQuery)
}

If we use Using(){} it will automatically dispose all objects.

We need to declare and use all SPObjects in Using clause

Sunday, September 26, 2010

Master Pages in SharePoint 2010

SharePoint 2010 brings a few new master pages that you may want to know about. There are additional master pages to accommodate both the old and new versions of UI. There are also some simplified pages to take note in.
The first master page we will talk about is v4.master. This is the default team site master page used with version 4 (obviously) of the UI. This will be the master page you typically use. It provides the ribbon bar and all of the other new visual UI changes such as the site actions menu on the left side.
If you did an upgrade to SharePoint 2010 and haven’t transitioned to the new UI yet, the old master page is still in default.master. This looks just like the master page you use in SharePoint v3 today. It doesn’t have the ribbon bar and the site actions menu is still on the right side.
The search pages by default now use minimal.master. This is a really slimmed down master page with next to nothing on it. It doesn’t even have navigation. I’m not sure why they opted to use this page in Search Center, but I think it provides and issue with people trying to leave the search center. The Office Web Applications also use this master page but that makes a little more sense because it provides more screen real estate.

The last page I will mention is simple.master. This page is used for login and error pages. From what I understand, it can’t be customized (I have no idea why), but it can be replaced.
I hope this helps if you were curious about the new master pages. I’ll also remind you again that application pages can also now make use of any branded master pages you might have created. I’ll also point out that the master pages all use properly formed XHTML although I am not sure about default.master. I will check that when I get a chance.

Tuesday, September 21, 2010

Difference between sharepoint foundation and sharepoint server

Regarding “SharePoint Foundation” and “SharePoint Server 2010”, the important thing to understand is that SharePoint Foundation is the foundation, and SharePoint Server is simply an optional add-on package of more advanced features. In fact, you cannot install SharePoint Server by itself, because installing it automatically also installs SharePoint Foundation.

So the question is:

What differs between SharePoint Foundation and SharePoint Server?

What version do you need?

The answer depends on your requirements, and not so much on the size of your organization. For example, if you want a good platform for a basic intranet plus collaboration and project management, then SharePoint Foundation may be just what you need. If you need the best web content management, more advanced document management, or tight integration with Excel, Access, and Visio, then SharePoint Server is what you need.


SharePoint Foundation

Here are some of the more frequently used features and characteristics of SharePoint Foundation:

It’s a web based application running on top of Internet Information Services (IIS)
It’s a free 64 bit only add-on to any edition of Microsoft Windows 2008 Server or
Windows 2008 R2
It requires a 64 bit Windows Server operating system
It stores all its data and information in one or more Microsoft SQL Server databases
It displays information using a web page file, usually containing one or more web parts
It has very good document management features, such as version history, custom metadata, and Microsoft Office integration
It has a number of list types that you can use for storing different types of information, such as documents, contacts and calendar items
It enables you to build workflow solutions; for example, sending an email to a given user
When a document is changed or a list column is set to a specific value
It’s perfect for building basic, but effective, intranet solutions, with its built-in web content management features
It’s ideal for collaboration on project data, meetings, social events, blogs, and such


But there are also important features that SharePoint Foundation does not offer. Here are just a few examples:

No built-in advanced search functionality. SharePoint Foundation offers limited search
functionality, but still it will only allow users to search within the current site and sites below it
No advanced web content management features, such as publishing control, targeted
information, and multilingual support
No advanced document management features, such as global document IDs, document sets, and document policies
No record management of legal and other important documents
No support for displaying InfoPath forms in a web browser
No support for displaying MS Excel spreadsheets as web parts
No support for displaying MS Visio 2010 diagrams as a web part
No support for key performance indicators (KPIs)
This is where SharePoint Server 2010 comes in.


SharePoint Server 2010

SharePoint Server 2010 uses the same types of web sites and features as SharePoint Foundation but adds a lot of functionality. In addition to the previous list, SharePoint Server 2010 also provides the following features:

Use the global search functionality to find any type of information, regardless of type and location, based on content or metadata properties
Use Social Search to find people based on their typical activities and interests
Target displayed information to one or more user groups
Import user properties from AD, and make them searchable
Use advanced content management features for public Internet sites or portal intranet sites
Allow globally unique document IDs and document sets
Display and use InfoPath forms with a web client, using the Forms Service
Display Microsoft Excel spreadsheets and charts in a web part, using Excel Services
Display Microsoft Visio 2010 diagrams directly on a web page, using the Visio web part
Search, display, and edit content in external databases, such as SAP, Oracle, and Microsoft SQL, using the Business Connectivity Service
Give each SharePoint user a personal website, for both private and public use
Create dashboards with scorecards and key performance indicators
Currently rated 5.0 by 1 people

Friday, August 13, 2010

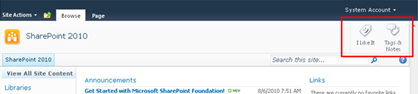
Changing i like it ,change notes butoon to small icons in sharepoint 2010 ribbon

To convert the large social buttons to smaller ones you simply have to modify the following:

Within your custom Master Page search for: “GlobalSiteLink3”

Simply Add “-mini” to the control ID

Original Large Control:


New Small Control ID:


If you want to make the small buttons horizontal versus vertical simply add the following to your custom CSS:

.ms-mini-socialNotif-Container{
white-space: nowrap;
}

Wednesday, August 11, 2010

Back up and Restore

1)Create content database backup for particular sharepoint website
2)Delete web application along with content database if it is same server
3)restore the back up what you have create in first step
4)Create new web application,While creating give database name as same as what you ahve restore.
5)after creating web applicationdon't create any site collection
6)Just close the window and open site with url directly in browser
7)The backup site will open in new web application(new url) same as like deleted site.

Monday, August 9, 2010

Column Validation in SharePoint 2010

The ability to easily validate the column values entered into list items is a welcome addition to SharePoint 2010. I'd like to walk thru 2 simple example s of how to use column validation, at the column level, then at the list level. I'll then point out some specific notes about this feature.

Simple Example #1 - Column Level
Create a new column on a list, and click "Column Validation":


2.Add a validation Formula, and a message that will display if validation fails:


3.Create a new item, and enter a value that will not validate. Click OK. You will see your failure message:


Simple Example #2 - List Level
In the List Settings, click on "Validation Settings"


Enter a validation formula to apply to this list. Click Save.


Create a new list item, entering in values that will not validate. Click OK. The item does not save, but the User Message doesn't appear either. I assume this is a bug, and it ought to be fixed before RTM.


Field Types
In this simple example we used a "Single Line of Text" field type. The following field types can be validated with the "Column Validation" feature:
Single Line of Text
Choice (single only)
Number
Currency
Date & Time

Formulas
You can only compare column values to one another in a list level validation.
A validation formula at the column level cannot include any other columns besides itself. For example, [Column1]>[Column2] is an invalid formula and SharePoint will not allow it to be used at the column level. In this case, you want to use list-level validation.
There is only one formula available at the list level.
The formula syntax is similar to that used in Calculated Columns
There are a few dozen functions available - I have not tried every one. One interesting thing to note is that SharePoint 2010 would not allow me to use the TODAY function, even when validating a Date field. [DateColumn]>TODAY is not a valid validation formula.

Conflicts
What if you have both column level validation and list level validation?
The column level formulas will be evaluated first, then the list formulas
What if the column and list level validations are in conflict?
Example - at the list level, you require that [Text1] = [Text2], but each column has it's own validation; [Text1]="AAA", and [Text2]="BBB". In this case, it will be impossible to actually submit a list item. The column validations are evaluated first, but if the values validate here, they will of course fail the list validation.
What if the list level validation includes columns not included in a particular content type?
If a column used in the list formula isn't available in the current content type, validation will always fail. This means that if you have multiple content types in your list, you should not validate at the list level for a column that is not included in all content types on the list. These columns can only be validated at the column level.

Site Columns
You can set validation on custom columns of the field types listed above
You can override the validation of a site column at the list level

Items To Investigate
How does validation behave with page fields in a Pages library on a publishing site?
How does validation behave in Office client applications?
Is validation available in the Site Directory? Does it work at site creation time?
Can we use regular expressions in a validation formula?

Cascading Drop-Down List in SharePoint 2010 using InfoPath 2010

Cascading drop-down is a common business requirement. SharePoint 2007 does not support cascading drop-down list by default. User have to write custom SharePoint field and it’s not easy to implement. With SharePoint 2010, User able to customize SharePoint form in easy way by using the powerful of InfoPath Designer. Following is the step guides to create a cascading drop-down list solution in SharePoint 2010 without require a lot of IT knowledge.
Scenario: We build a cascading for Address List. We have three list: City, District and Ward
1. Create City List
- In SharePoint 2010, create a custom List and named as “City”
- Add Two Item to this list: Hanoi and TP HCM
2. Create District List
- In SharePoint 2010, create a custom List and named as “District”
- Create a Lookup column named as “City”. This column get information from City List in the column Title.
- Add 4 items to District list


3. Create Ward List
- In SharePoint 2010, create a custom List and named as “Ward”.
- Create a Lookup column named as “City”. This column get information from City List in the column Title.
- Create a Lookup column named as “District”. This column get information from District List in the column Title.
- Create on Add new Item link you will see. When we choose City, District still have 4 item.


4. Customize Ward form to meet cascading requirement
- In Ward List, click on Customize Form ribbon button


- System will automatically open the form template of Ward list in InfoPath Designer


- Right click on District drop-down list control then select Drop-Down List box Properties from menu to open the properties windows


- In Data Source. Click on Add button
- In Data Connection Wizard, click on Next button


- In Select the source of your data, choose SharePoint library of list then click Next button


- In SharePoint Site details screen, click on Next button


In Select a list of library, choose District the click on Next button


In select fields: Choose Title, City, ID then click on Next button


In next screen, choose Next button


- Leave the default name for the connection as “District1” then click Finish button


Now, You will see the Data Source of Drop-Down list box is District1


- In Entries section, click on the tree button to select XPath
- In Select a Field or Group dialog, click on Filter Data… button


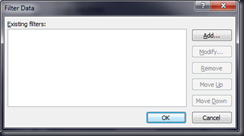
- In Filter Data click on Add… button


- In specify Filter Conditions, in the first drop-down list choose Select a field or group


Select a Field or Group opened. Select District1 as Data Source, choose City in dataFields then click OK


In specify Filter Conditions, in the last drop-down list choose Select a field or group


Select a Field or Group opened. Select Main as Data Source then choose City in dataFields then click OK


Click on OK to close specify Filter Conditions dialog
- Click on OK to close Filter Data dialog
- Click on OK to close Select a Field or Group
- In Drop Down List box properties, choose d:ID in Value: section then click OK to close this


- In InfoPath Designer, close the Windows then choose the Save and Publish button


- After Publishing complete, back to Ward list then click on Add new item link. You will see the result


Two drop-down list has been cascading.

Sunday, August 8, 2010

Access denied while accessing External content type through External List(BDC)

You may encounter “Access denied by Business Data Connectivity” error when trying to access External List. The reason is because External List requires External Content type ; and External Content type is using Business Data Connectivity services proxy to access external Data Source. With the same principle of BDC in MOSS 2007 – users are required to have BDC Object permission before they can use it. There are several set of permission available for the BDC

Edit
- Execute
- Selectable in Clients
- Set Permissions

How to configure the BDC access rights?

1. Open Central Administration page, and click on Manage service application.


2)2. Click on Business Data Connectivity Service


3. Open the context menu of the External Content type (ie. External CT in this example). Click on Set permissions.


4. Add account (Group, or User) and assign the permissions.


5. Set appropriate permission to the BDC object. Remember that BDC object permission rules the interaction between user and external data source through BDC object. It doesn’t rules his/her permission accessing Forms in the list (New / Edit / Delete form).

Error occured in deployment step 'Add Solution': Property 'SiteUrl' contains an invalid URL

http://weblogs.asp.net/jan/archive/2010/05/07/sharepoint-2010-bdc-model-deployment-issue-the-default-web-application-could-not-be-determined.aspx

Create a new Business Data Connectivity Model project in Visual Studio 2010 and (optionally) implement all your code, change the model etc. When you try to deploy you get the error mentioned above.
To fix it, in the Solution Explorer, navigate to and open the Feature1.Template.xml file (the name could be different if you decided to give your feature a different name of course).


Add the following XML in the Feature element that’s already there (replace the Value with the URL of your site of course):


The resulting XML should look like:


Deploy the solution, now without any issues. :-)

Tuesday, August 3, 2010

Changing dd/mm/yyyy(UK english) to mm/dd/yyyy(US english) in sharepoint programatically

Take one label and one button (by default label will display the current date
if we click on the button it will show us format(mm/dd/yyyy)


string strdate = "";
string startdate = "";
SPWeb spWeb = new SPSite(SPContext.Current.Web.Url.ToString()).OpenWeb();
startdate = System.DateTime.Now.ToString();

Label1.Text = startdate;(To display current date)

//method to change date format dd/mm/yyyy to mm/dd/yyyy


public void GetDates(string date, out string Date)
{
Date = "";
string strYear = "";
string strMonth = "";
string strDay = "";


string[] Dates;
Dates = date.Split('/');
for (int i = 3; i <= Dates.Length; i--)
{
if (i > 0)
{
if (i == 2)
{
if (Dates.GetValue(i - 1).ToString().Length == 2)
{
strMonth = Dates.GetValue(i - 1).ToString();
}
else
{
strMonth = "0" + Dates.GetValue(i - 1).ToString();
}
}
if (i == 3)
{
strYear = Dates.GetValue(i - 1).ToString();
}
if (i == 1)
{
if (Dates.GetValue(i - 1).ToString().Length == 2)
{
strDay = Dates.GetValue(i - 1).ToString();
}
else
{
strDay = "0" + Dates.GetValue(i - 1).ToString();
}


}
}
if (i == 0)
{
Date = strMonth + "/" + strDay + "/" + strYear;
return;
}
}
}


protected void Button1_Click(object sender, EventArgs e)
{
// SPWeb spWeb = new SPSite("http://jagadeeshv:2222").OpenWeb();

if (spWeb.RegionalSettings.LocaleId != 1033)
{
GetDates(startdate, out strdate);
startdate = strdate;
Label1.Text = strdate;
}
else
{
Label1.Text = startdate;
}
}

Getting or finding Locale ID(Regional settings) programatically (Getting current culture ID) in sharepoint

spWeb.RegionalSettings.LocaleId=1033(for US english)

Monday, July 26, 2010

Adding URL(Hyperlinks) Description programmatically to a list in SharePoint

SPFieldUrlValue linkUrl = new SPFieldUrlValue();
linkUrl.Description = “Whatever”;
linkUrl.Url = anURL.ToString();
anItem["URL"] = linkUrl;
anItem.Update();

or

SPSite site = new SPSite(url);
SPWeb web = site.OpenWeb();
SPList list = web.Lists[listName];
SPListItem item = list.Items.Add();
item["Hyperlink"] = stringUrl + “, ” + stringDescription;
item.Update();

Programmatically adding items to a SharePoint list

SPWeb web = new SPSite("http://jagadeeshv:9999/abc").OpenWeb();
SPList list = web.Lists["Links"];
SPListItem newItem = list.Items.Add();

SPList list = web.Lists["Tasks"];

SPListItem newItem = list.Items.Add();

newItem["Title"] = "Creating New Task";
newItem["Status"] = "Not Started";
newItem["Priority"] = "Normal";

newItem.Update();

Creating Site programatically using sitetemplate(.stp file)

SPSite oSiteCollection = new SPSite(“http://servername/SiteDirectory”);
//(SPSite oSiteCollection = new SPSite("http://jagadeeshv:9999"))
SPWeb oWebSite = oSiteCollection.OpenWeb();
SPWebCollection oSitesCollection = oWebSite.Webs;
SPWeb newWebSite = oSitesCollection.Add("abc", "siteTemplate", "This is site created through code.", 1033, "Createsitestp.stp", true, false);

Tuesday, July 20, 2010

Simple workflow using WindowsWorkflowFoundation using visual studio 2005 for sharpoint

Windows SharePoint Services (WSS) 2007 is the first Microsoft server that has native support for the Windows WorkFlow Foundation (WF). The integration of WF and the 2007 release of SharePoint provides an infrastructure that drives processes around SharePoint's strong suit: collaboration and sharing of information. This release focuses on document-centric workflows, the procedures that a particular document goes through in its lifecycle (be they reviewing, editing, or approval). The new edition enables you to attach and run a process directly in a SharePoint document or list item. Additionally, the workflows within SharePoint spotlight human-based endeavors, tasks driven by human interaction as opposed to static, automated programmatic steps.
To examine the process, this article follows a report that needs to be approved before publication:
1. A document containing a report can automatically generate an Approval workflow, or the author can initialize it manually and select the individuals who need to approve it.
2. The workflow assigns approval tasks to those people and they are notified of their tasks via email.
3. They can assign their choice by clicking "approve" or "reject" on a special form provided by the workflow.
4. When all approvals are completed, the author receives notification that the report has been approved (or rejected) and it is ready for publication.

The Basics

SharePoint Server 2007 provides various out-of-the-box workflows that require no additional attention before using. These workflows include Approval (routes a document for approval), Collect Feedback (routes a document for review), Collect Signatures (gathers signatures), Disposition Approval (manages document expiration and retention), Group Approval (similar to the Approval workflow, but designed specifically for East Asian markets), Translation Management (manages document translation), and Issue Tracking (manages the issue tracking process by creating tasks for active issues assigned to users).
Many processes are very specific to an individual company's needs. Therefore, the WorkFlow Foundation provides an extensible infrastructure that can be used to create sophisticated workflows. WF provides a powerful platform with a unified programming model, and it works with familiar developmental tools such as Visual Studio 2005. Less powerful SharePoint workflows also can be created with SharePoint Designer (formally FrontPage), a web design and customization tool that allows users to create workflows without writing any code.

Using the Right Tools

A standard Visual Studio installation lacks the necessary tools to work with the WorkFlow Foundation, so to put things in motion you must install the Visual Studio 2005 extensions for .NET Framework 3.0 (Windows Workflow Foundation). The extensions provide the required references to the Foundation assemblies, the essential Activities needed, as well as the WorkFlow designer within Visual Studio and a number of project templates. Keep in mind that you must install DotNet Framework 3.0 as a prerequisite to working with WF.
A Visual Studio 2005 extension that is compatible with the WorkFlow Foundation to work with SharePoint is available, but at the time of writing it was in beta (Workflow Developer Starter Kit for Windows SharePoint Services 3.0). Note that this extension is not required if you are developing workflows for SharePoint (the extension makes a new template to initialize a project).
The first step in creating a workflow for SharePoint is crafting a new project in Visual Studio 2005 based in the Sequential Workflow Library (or in the State Machine Workflow Library, if you are making a state machine workflow) and assigning it a name. Visual Studio will generate the necessary code and configuration files. Add a reference to Windows SharePoint Services (Microsoft.SharePoint.dll) and, if you need to work with Microsoft Office SharePoint Server, a reference to Microsoft Office SharePoint Server component (microsoft.sharepoint.portal.dll). This establishes references to the object model of SharePoint, opening the door to interactions with it.
Although it's not compulsory, it simplifies coding if you write directives to the next namespaces in the code behind file, for example:

using Microsoft.SharePoint;
using Microsoft.SharePoint.Workflow;
using Microsoft.SharePoint.WorkflowActions;

Finally, you need to add an activity to the Visual Studio toolbox. Using the context menu (right-click into the toolbox), select Choose items and in the .NET Framework Components tab, check the OnWorkflowActivated activity to activate it in the toolbox. This activity is indispensable for running workflows in SharePoint.
As a demonstration, the following example builds a simple workflow that illustrates the lifecycle of a WF within SharePoint: initializing the workflow, transporting information from SharePoint, processing it, and feeding it back to WSS (see Figure 1).
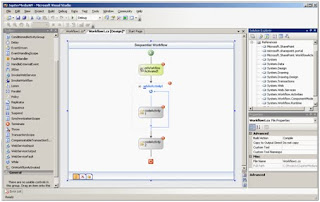


Figure 1. The Example WorkFlow in the Visual Studio WorkFlow Designer
You initialize the process by creating the workflow using the WorkFlow Designer in Visual Studio. The opening activity is always the OnWorkflowActivated for workflows in SharePoint. Next, install a While activity with a Code Activity inside to process the information. Finally, install another Code Activity to return information to SharePoint. Bear in mind that this is not a functional workflow you would use in a business application, but a demonstration of each part of the interaction between WF and SharePoint.
Extracting Information from the External World: SharePoint to the WorkFlow
The first stage in the codification of the workflow involves defining some variables in the code behind page to be used later, for example:
public SPWorkflowActivationProperties FlowProperties =
new SPWorkflowActivationProperties();
private string _myDocument = string.Empty;
private int _CounterLetters = 0;
private int _CounterVowels = 0;
The activation properties will be stored in the FlowProperties variable, and extra global variables for the internal work are defined.
As Figure 1 shows, each activity has a red mark at the right corner, indicating that the configuration is incomplete. Returning to the Designer, you now can configure the OnWorkflowActivated activity using the defined variables (see Figure 2).
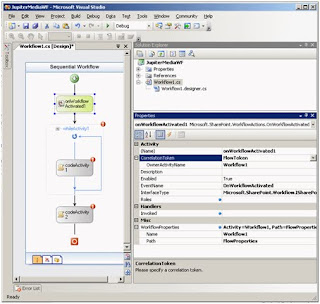


Click here for a larger image.
Figure 2. Configuration Panel of the OnWorkflowActivated Activity
In the Properties panel, create the subsequent configurations:
1. Correlation Token: Choose a distinctive name (FlowToken, for example). After the name configuration, a plus symbol will appear where the OwnerActivityName can be selected (Workflow1 in the example).
2. Click the ellipses button of WorkFlowProperties and, in the new window, choose the code defined previously in FlowProperties.
If the configuration parameters are correct, the red mark in the activity will disappear.
As with all Visual Studio projects, if you double-click on an activity, Visual Studio will fashion the corresponding event handler. When you double-click the OnWorkflowActivated activity, Visual Studio writes the event handler method automatically and the user writes the corresponding logic inside:
private void onWorkflowActivated1_Invoked(object sender,
ExternalDataEventArgs e)
{
SPListItem myActivator = FlowProperties.Item;
_myDocument = myActivator.Name.ToLower();
_CounterLetters = _myDocument.Length;
}
By using this activity, you can find all the relevant information from the SharePoint context. The flow is initialized by an element of a List (of the SharePoint type SPListITem), and from the object that contains the element information, you can find its name (located in the variable _myDocument) and the number of letters in the document name (stored in the _CounterLetters variable).
In the FlowProperties object, you can find all the necessary information from the SharePoint context. The SharePoint web, site, and list objects are present, as well as the Task List that generates alerts for other users. Everything you need to process the variable later is present.
Processing the Information: the WorkFlow in Action
Once the information from SharePoint has been captured, the next step is to process it. With a double-click on the activity inside the While loop, Visual Studio generates the corresponding event handler, where you can write the business logic:
private void codeActivity1_ExecuteCode(object sender, EventArgs e)
{
_CounterLetters--;
char[] AllVowels = new char[] { 'a', 'e', 'i', 'o', 'u' };
Array.Sort(AllVowels);
if (Array.BinarySearch(AllVowels,
_myDocument[_CounterLetters]) >= 0)
_CounterVowels++;
}
The procedure for the example will count the number of vowels in the name of the document. The algorithm is not optimal for a large number of instances of the workflow, but sufficient for the example (the method IndexOf of the array may be a more effective way to calculate the number of vowels).
At this point, it is important to construct the configuration of the While activity. From the Properties panel, compose the following configurations:
1. Condition: Choose "Declarative Rule Condition."
2. ConditionName (expanding the Condition property): Give it a recognizable name.
3. Expression: In the "Rule Condition Editor," which can be activated by using the ellipses button, write the condition necessary to remain in the loop (for the example, "this._CounterLetters > 0"). Until all the letters are "read" and the vowels are counted, the loop statement will continue.
This step is essential to the overall workflow because it implements the flow's logic. The example uses only one code activity inside a loop activity, but in an actual situation it would be composed of many different kinds of activities.
Taking Information Back to the External World: From the WorkFlow to SharePoint
The second Code activity in the example controls returning the processed information from the WorkFlow engine to the SharePoint context. You can use the event handler of the activity to write information back into SharePoint as follows:
private void codeActivity2_ExecuteCode(object sender, EventArgs e)
{
SPListItem myActivator = FlowProperties.Item;
myActivator["Title"] = _myDocument + " has " +
_CounterVowels.ToString() + " vowels";
myActivator.Update();
}
Initially, the code crafts an object of the type Microsoft.SharePoint.SPListItem, calling the Item method of the SharePoint properties, and then changes the title of the element that has begun the WorkFlow, appending a string and the calculated number of vowels in the name of the document.
Because the workflow has access to the complete context of SharePoint, it can perform internally any authorized modification (write to lists and libraries, change properties, as well as create, edit, and delete elements). Everything, that is, within the authorization and authentication context of the user who has initialized the WorkFlow.
An additional method of interaction with users is to employ ASP.NET forms that you apply with your Windows SharePoint Services workflow. You then display these forms in the SharePoint user interface at the appropriate stages in the workflow. There can be four types of forms:
• Association: This form will be displayed to administrators when they first add or associate the WorkFlow with a particular List or document Library.
• Initialization: A user starting the WorkFlow manually will be confronted with this form. At this point, the user may override or append the association parameters.
• Modification: The form that enables users to alter the WorkFlow while it is running.
• Task: This form assigns jobs to the flow participants.
Deploying and Using the WorkFlow
Because the assembly of the workflow generated by the compilation in Visual Studio must be installed in the Global Assembly Cache (GAC), it needs to be signed as strong. You can use the standard Visual Studio 2005 infrastructure to sign it or the sn tool with the parameter -T. After the compilation is complete, you can use the gacutil tool to install the assembly in the GAC.
You use features to deploy workflows in SharePoint. As a new paradigm in SharePoint 2007, the feature was created as a way to encapsulate solutions and functionality for ease of deployment. Additionally, it provides a mechanism by which developers can package the files needed for a solution (as a workflow) intended for distribution.
Each feature must include a WorkFlow definition template (an XML file) that contains the information SharePoint requires to instantiate and run the WorkFlow, as well as a feature definition (also an XML file) with information concerning the feature itself. To install the example workflow, create a new Feature.xml file with the following code:

Title="JupiterMediaWorkFlow"
Description="Example WorkFlow"
Version="12.0.0.0"
Scope="Site"
xmlns="http://schemas.microsoft.com/sharepoint/">


The Feature Id parameter is a Windows GUID that you can fashion with the GUID Generator component included in Visual Studio. A second file called Flow.xml, with the following code, defines the WorkFlow for SharePoint:


Description="Example WorkFlow"
Id="B2196C5B-1579-4bb7-B23E-01DC6A898ABC"
CodeBesideClass="JupiterMediaWF.Workflow1"
CodeBesideAssembly="JupiterMediaWF, Version=1.0.0.0,
Culture=neutral,
PublicKeyToken=99ca3967f3ef49e3">

_layouts/WrkStat.aspx


Copy both files to a new directory under the hive:
C:\Program Files\Common Files\Microsoft Shared\
web server extensions\12\TEMPLATE\FEATURES\JupiterWF
And install and activate the workflow using the SharePoint Administrators tool stsadm, with the following syntax:
To install the workflow:
C:\Documents and Settings\Administrator>"C:\Program Files\
Common Files\Microsoft Shared\web server extensions\12\BIN\
STSADM.EXE" -o activatefeature -name JupiterWF -force
To activate the workflow:
C:\Documents and Settings\Administrator>"C:\Program Files\
Common Files\Microsoft Shared\web server extensions\12\BIN\
STSADM.EXE" -o installfeature -name JupiterWF -force
At this point, you must link the workflow with the document library where it will operate (see Figure 3).
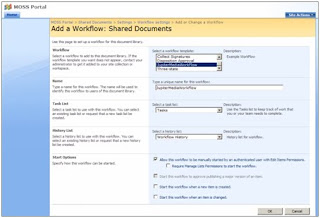


Click here for a larger image.
Figure 3. Setup of the Workflow in a Document Library
From the Document Library Settings page, proceed to Workflow Settings and, using the page Add a Workflow, select the workflow from the ComboBox. Give it a name, decide on a List to be used for its tasks and another one for the History (either use an existing list or create a new one), and select the start options (you can start it manually or automatically).
After creating a new document in the library, the user can utilize the context menu of the element to proceed to the page where he or she can select and activate the workflow (see Figure 4).
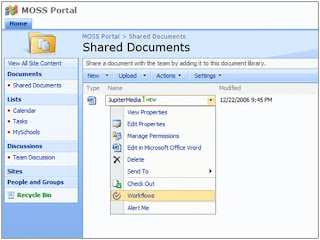


Click here for a larger image.
Figure 4. Activating a WorkFlow for a Document
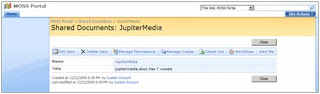
Multiple workflows can run simultaneously on the same item, but only one instance of a specific workflow can run on a specific item at any given time. At the end of the working process of the flow, the result appear in the properties page of the document (see Figure 5).


Click here for a larger image.
Figure 5. Properties of the Document After Completing the WorkFlow
Note: In the properties page, the workflow has made a count of the vowels in the document's name and has altered its title to include the counter.
Integrating Divergent Worlds
The interaction between the Windows WorkFlow Foundation and Microsoft SharePoint 2007 offers an excellent way to attach business processes to items, and it provides the opportunity to control almost any aspect of a document's lifecycle and user interaction within SharePoint. A workflow can be as simple or complex as your business process requires, and it can be initiated either by users or automatically based on some event.
The architecture of the Foundation and its implementation in SharePoint allows for substantial flexibility to make changes in the business layers. It provides the option of reuse without having to alter the portal's deep infrastructure and unlocks new prospects for software architects, developers, and system administrators.
Download the Code
You can download the example workflow here.

Content Editor Webpart not showing up in SharePoint Online ------------------------------------------------------------------------------...